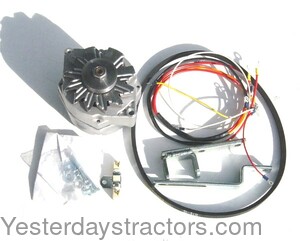
Welcome! Please use the navigational links to explore our website.
PartsASAP LogoCompany Logo Auction Link (800) 853-2651

Shop Now

   Allis Chalmers Case Farmall IH Ford 8N,9N,2N Ford
   Ferguson John Deere Massey Ferguson Minn. Moline Oliver

Ford Tractors Discussion Forum
:

Ford Hundred Series 12V Conversion (very long)

Welcome Guest, Log in or Register
Author 
john in la

11-15-2004 05:32:11


Report to Moderator

OK guys I told you months ago I would put together a step by step guide to converting a Ford hundred series to a 12v alternator.

Well since I do have a life other than the computer it took me longer than I thought to get it together. But it is finally done so here it is.

Hope this helps you under stand how this is done and makes for a easier conversion.


[Log in to Reply]   [No Email]
ozbo

11-16-2004 15:07:00


Report to Moderator
 Re: Ford Hundred Series 12V Conversion (very long) in reply to john in la, 11-15-2004 05:32:11  
John: absolutely excellent dissertation! Right on! You can get the alternator bracket for attaching from many local tractor shops or FNH. They are expensive, about $25 but well worth it unless one is a good welder.


[Log in to Reply]  [No Email]
john in la

11-15-2004 05:42:56


Report to Moderator
 Introduction in reply to john in la, 11-15-2004 05:32:11  
Ford Hundred Series 12V Conversion

So you have decided to convert your Ford hundred series tractor to 12v for whatever the reason. Their are many ways of converting but this is a step by step guide of how I would do it using a Delco 10SI alternator. This guide is set up for the 601/801 with a dash light but I will try to adapt it to the 600/800 model also for those that need that setup. I will also try to add some testing procedures so you can check your system if you should ever have any problems.

Lets all get on the same page by me starting with the fact that this is not for everyone. Whether or not you leave your tractor 6v or convert to 12v is a personal decision. Whether you use a new 12v regulator with your old 6v generator or use these steps is also a personal decision. Converting from 6v to 12v can be the best thing you ever did for your tractor or your worst nightmare depending on how you do it. All parts are available at part stores or over the internet and just bolt on. While it cost more some may want to buy a ready to install kit to do this conversion. These kits save a lot of leg work trying to find all the correct parts. I have seen these kits available from many places but I must warn you some of these kits are put together the cheapest way. I have even seen some that will cause problems down the road just because they do not have the correct parts to do it properly. At the very least I think you should read through these pages so you can get a idea on how this system works. It should give you the info you need to help you decide what path is best for you and tell you how to install it correctly. If you are interested in a conversion kit this site (YTMAG) sells a kit. You can see it Here third party image

While I have never bought one of these kits it may be right for you. The question I would ask is if the alternator is a 3 wire set up or a true 1 wire setup. You can not tell them apart by looking at them. The only difference is the internal regulator. If it is not a true 1 wire; is some form of diode included in the wiring harness to prevent feed back through the #1 or F wire to the coil. Another thing to look at is does it come with a 12v to 6v resistor or a 12v coil and does the coil need a resistor.
The 3 wire alternator was used in cars and I think it is best for a tractor. You can get a 3 wire alternator from any parts store. My AutoZone store has them for $23.99. The true 1 wire alternators were originally used on marine engines. They are more expensive. J.C. Whitney has the marine alternator for $129.99 plus $16.99 in shipping. They also have a 3 wire car alternator that has had the regulator replaced with the 1 wire regulator. It goes for $79.99 plus $13.99 in shipping. That is $93.98 I do not feel this alternator is worth $69.99 more than the AutoZone alternator but that is your choice.
The thing you need to watch for is some will sell you a 3 wire alternator and tell you to wire it with only 2 wires leaving the 3rd wire that hooks to the #1 or field terminal on the alternator off. This will work but requires you to rev the cold engine all the way up to get the alternator to start charging. Not a good idea in my mind.

If you are trying to crunch the numbers to see if you want to do this or whether you want to buy a kit or get the parts at a local parts house lets go over what you need. Remember all these parts will not be in the kit and some will have to be bought locally.

Delco 10SI alternator
5/8” alternator belt pulley
Delco wire adapter for spade plugs on the alternator
Alternator bracket
A 12V to 6V coil resistor OR a 12V coil
Miscellaneous wire and wire ends
12V battery
Dash charging indicator light or one way diode
A simple $20.00 volt/ohm meter from Wal-Mart is also good to have for testing.

That is all you will need to get the tractor running but you will eventually need to replace all your light bulbs and gauges that use electricity such as the fuel and amp or volt gauge.

So now lets look at every part in the system 1 by 1 and see what you need new and what can stay.

[Log in to Reply]  [No Email]
john in la

11-15-2004 05:41:50


Report to Moderator
 Battery in reply to john in la, 11-15-2004 05:32:11  
1) Battery
Your old 6v battery will have to be replaced by a 12v. The physical size of the battery is what you need to watch to make sure it will fit the allowed space. You will need to take your old battery in for a core and proper disposal so you can also match up the size. Your group 1; 6v battery should match up with a group 25; 12v battery or a group 35 which has the terminals reversed. You could also use the more popular and smaller group 26 battery. The CCA (cold cranking amps) of 600-800 amps should be more than adequate for the south. You northern guys may need a little more. For tractors that or not used daily a heavy duty battery will hold up over the long term better than the discount automotive batteries.

Testing; You can test your battery to see if it is charged with a volt meter. Use the meter and do not guess at it by looking at how bright the lights are. To truly test the battery though you will need to take it to a shop or parts store and have a load test done on it. Remember with your new 12V system it will be negative ground and positive to the starter relay.

[Log in to Reply]  [No Email]
john in la

11-15-2004 05:40:52


Report to Moderator
 Starter Relay in reply to john in la, 11-15-2004 05:32:11  
2) Starter Relay
Your 6v starter relay will work in the new 12v system; however any imperfections or worn spots will be multiplied by using 12v’s. If you need a new one get a 12v relay from Ford/New Holland. Just ask for the 4 post 12v relay that was used on the 801 diesel model. You can not use the 4 post relay from the car parts store. It is wired different and will not work with the grounding starter button on the transmission. If you are redoing a 600/800 with the 3 post relay you can get a new 4 post or use the old 6v 3 post.

Testing; The 4 post relay used on the 601/801 works like this. The battery gets hooked to one of the large studs and the starter to the other. The small I terminal gets hooked to the terminal block so it has power only with the key on. The power goes through windings in the relay and out the small S terminal which gets hooked to the starter button on the transmission. You should have power at both small terminals and the starter button with the key on. When you push the start button it grounds this power causing the windings in the relay to magnetize and move a plunger that connects the two large terminals sending power to the starter.
The 3 post relay on the 600/800 works the same way except it does not have the small I terminal. It gets its power internally from the big battery terminal and not from the key. If you do not have power at the small terminal with the battery hooked up your relay is bad OR you have the battery hooked to the wrong big terminal. The bad part about this relay is it has power to crank the motor all the time. All you need to do is push down on the starter button where as the 4 post relay can only crank with the key on. This is probably one of the main reasons Ford changed to the 4 post relay in the 601/801. They offered diesel motors and if it were to crank it could start as you do not need any power for a coil.

[Log in to Reply]  [No Email]
john in la

11-15-2004 05:40:01


Report to Moderator
 Starter in reply to john in la, 11-15-2004 05:32:11  
3) Starter
Your old 6v starter will work in your new 12v system. Like the relay any imperfections in the starter or ring gear will be multiplied with 12V. Do not crank on your 6v starter for more than about 10 seconds at a time with out allowing it time to cool off. This will keep it from over heating and burning up. Other than that the 6v starter will be fine. If you ever need to have your starter rebuilt it is a good idea to have it rewound to 12v’s while you have it in the shop.

Testing;
You can remove the starter and use a set of jumper cables to test it. One cable goes to the starter case and the other to the starter post. It should run like this. For a better test take it to a shop or parts store and have a draw test done on it. This shows how many amps it takes to run the starter.

[Log in to Reply]  [No Email]
john in la

11-15-2004 05:39:12


Report to Moderator
 Alternator in reply to john in la, 11-15-2004 05:32:11  
4) Alternator
You will be replacing your 6v generator and external regulator with a 12v alternator with internal regulator. There are several choices but this set up calls for a Delco 10SI 3wire alternator. They make a 1 wire alternator but I feel the 3 wire set up is far superior. You can see more info on this subject at M.A.D. Enterprises web site. I use a 9 o-clock set up since the alternator mounts on the left side of the engine. This means when you look at the back of the alternator with the adjusting bolt straight up the wires will hook at the 9 o-clock position. This makes for easy mounting of the wires. If your parts man can not find the part with this info tell him you want a alternator for a 1979 Buick Regal, 8 cylinder 4.9L (301W) engine, with air conditioning. The Delco part # is 321-41 and a lot of part places have it listed under the generic # 7127-9. This will give you a 63 amp 9 o-clock Delco 10SI alternator.

Testing;
The battery terminal on the back of the alternator gets hook to the large battery post on the starter relay. So it has power all the time. This is the wire that charges the battery.
The #2 or S (stator) spade was originally hooked to power in the wiring harness to compensate for voltage drop in the wiring. With a tractors small wiring you can just connect it to the battery post on the back of the alternator via a short jumper wire. This wire tells the alternator when the charge is enough and shuts the regulator down as not to over charge the battery.
The #1 or F (field) spade gets hooked to the terminal block with power only with the key on. It energizes the alternator on start up so it will start charging. This wire is the dreaded night mare of the conversion so lets look at it in detail.
A lot of people do not understand how it works so they try all kinds of stuff to correct problems it can create. In fact many just leave this wire off and only hook up the above two wires. It will work like this; but as I said before you need to rev the cold motor all the way up to get the regulator to leak enough energy to start the alternator to charging. Some have even tried to put a smaller pulley on the alternator so it will spin faster at lower rpm’s. The 1 wire alternator uses a different regulator so it will leak enough energy at a lower rpm and only uses the wire that connects to the battery terminal; but like I also said I do not feel it is worth $70.00 just so you can leave these two wires off.
The problem lies in the fact that this #2 wire gets hooked to the terminal block in the same spot as the coil. Once the alternator starts to charge it will back feed power back through this wire. When you turn the key off to kill the motor it will not shut down since the coil is being fed from this power. So we need to find some way to send power to the alternator through this wire on start up but break the back feed of power to the ignition system. So how can we do this?
Well since you only need to supply the power to the alternator for a few seconds to get it to start charging I have seen some people that put a toggle switch or a starter/horn button in this wire. You would start the tractor and hit the button for a few seconds to start the alternator to charging then let it go. The alternator will continue to work as long as the tractor is running and when you shut it off the button is the break in the wire you need to shut down the motor. Problem is you need to remember to push the button every time you start the tractor. NOT LIKELY….
So we could go to Radio Shack and get a POWER diode. This allows power to go one way but not the other and works automatically. No buttons or switches to remember about. Ask for part # 1N4003. I think these diodes sell for about $1.00. While part # 1N4001 is a smaller one I have heard that people have been using this one also with no problems. The diode must be hooked up the correct way. The cathode end goes toward the alternator. This end is usually marked in some way such as a white band. You can test it by hooking it up and turning on the key with the motor off. If you have power on both sides it is hooked up correctly. If not turn it around.
But wait the 601/801 has a dash warning light and that is the way GM set this system up to work in the first place. See if we put a small 2 wire 12V light bulb in this wire it will work like it was originally set up to work. Power goes from the terminal block to the light and then out the second wire to the alternator. This makes the light come on but leaves enough power to energize the alternator so it will start charging. Once the alternator starts to charge it back feeds power to the light. Since the power is the same on both sides of the light it goes out and lets us know the alternator is charging. When we turn off the key this light bulb comes back on because it has power coming from the alternator but not the key. This happens so fast you may not even see it but it is enough to stop the back feed of power to the ignition system allowing the coil to stop firing and in turn shutting down the motor. If you do not have a 601/801 and do not want to drill a hole in your dash for the warning light but would like one that is possible also. All you need is a small trailer clearance light that does not ground through the case but grounds through a second wire. You can mount this any where under the dash. You may not be able to see it from the seat but it does its job of preventing back feed and if you suspect it is not charging a quick look at the light will tell you.

[Log in to Reply]  [No Email]
john in la

02-27-2005 04:44:57


Report to Moderator
 Re: Alternator in reply to john in la, 11-15-2004 05:39:12  
Another way of wiring the #1 or F wire has come to my attention so I thought I would add this update. This way may cost a little more but seems to be the best way I have found so far for tractors that do not have a dash warning light.

Like I stated before you need some kind of diode or light in the #1 wire to prevent back feed of power to the coil. This way uses a car ignition key available at Auto Zone for about $14.

On the back of the key switch you will see 4 post.

Battery; This is where the power wire coming from your terminal block will be hooked. (battery side)

Start; leave this plug empty because it is not used in our application

Run; This is where the wire the other wire bringing power back to the terminal block will be hooked.

Acc; This is where we are going to hook the #1 or F wire coming from the alternator. Do not run the #1 wire to the terminal block as the wiring diagram shows but hook it to this Acc. post instead. Remember in this set up you do NOT need any type of diode or warning light in this wire to make it work.

Hope this new way will help.

[Log in to Reply]  [No Email]
john in la

11-15-2004 05:38:01


Report to Moderator
 Alternator Pulley in reply to john in la, 11-15-2004 05:32:11  
Alternator Pulley
These tractors use a 5/8” belt. The Delco alternator came with a ½” pulley. Since the belt transfers power through the sides of the belt you need to use a 5/8” belt for it to turn your water pump properly. This causes the belt to ride high on the alternator pulley. Mine works great like this but if you have problems with the belt coming off you will need to remove your alternator pulley and install a 5/8” pulley in its place. Genesee products has these pulleys for $15.00.

[Log in to Reply]  [No Email]
john in la

11-15-2004 05:37:17


Report to Moderator
 Alternator Bracket in reply to john in la, 11-15-2004 05:32:11  
5) Alternator Bracket
This is the only part you can not buy at the parts house. This is one of the main reasons some buy a ready to install kit but first lets look at other possibilities. I have seen brackets for sale on e-bay or you may want to contact a place that sells kits and see if they will sell you just the bracket. You could also make or have someone make the bracket. I made my own bracket from material I had on hand. To make your own bracket you will need between 1 to 2 feet of ¼” x 1” bar stock. If you look at the picture in the first section you can see that it is only two pieces of metal welded together. If you have a torch and a welder you could make your own very easily. If you do not have a welder you could make the straight piece that bolts against the motor by cutting it with a hack saw and drilling out the holes. You could then mark on this piece where you would need the alternator to be and take this to a welding shop and have them bend the U shaped piece that fit’s the mounting ear on the alternator. They could then weld these two pieces together for you.
I used my old adjusting bar. I only had to bend the S shape in it a little to fit the alternator.

[Log in to Reply]  [No Email]
Rod M1

11-15-2004 14:35:02


Report to Moderator
 Re: Alternator Bracket in reply to john in la, 11-15-2004 05:37:17  
Just flip the alternator around and shim it with washers.


[Log in to Reply]  [No Email]
john in la

02-19-2005 06:29:59


Report to Moderator
 Re: Alternator Bracket in reply to Rod M1, 11-15-2004 14:35:02  
When you say flip the alternator around and shim it with washers what I think you meant was to flip the old generator bracket around.

I did try this on a recent conversion I helped a friend with so I will add this update.

Take the old generator bracket off and flip it end for end then rebolt it to the block using the same holes.
You will need a piece of all thread rod to fit the alternator mounting hole about a foot long and 4 nuts and washers. Install the all thread rod in the bracket and let it run long toward the front. You will want to have put nuts and washers to hold this rod in place in the bracket and put the alternator on the piece of rod that is running long to the front of the bracket.
It will look like this when you have it installed properly.
From the front..... ..... ..
Nut; Washer; Alternator; Front ear of bracket; Washer; Nut;..... ..... . Nut; Washer; Rear ear of bracket; Washer; Nut.
This set up should put your belt in the correct alignment. The top adjusting bar fit right up to the alternator adjusting bolt it is just on the rear side. No problem.... install the bolt from the rear through the adjusting bar and into the alternator.

Hope all this makes sense. If not some one let me know and I will try to explain it better or get a picture of what it looks like.

[Log in to Reply]  [No Email]
john in la

11-15-2004 05:36:19


Report to Moderator
 Coil and Distributor in reply to john in la, 11-15-2004 05:32:11  
6) Coil and Distributor
Every thing in your distributor stays the same. The points; condenser; rotor; and cap will all work with either 6v or 12v. The only upgrade you could do here is if you wanted to change over to electronic ignition. Do not rule out the electronic upgrade to fast either. Some think of electronic ignition and they think of new cars with computers and all those sensors and wiring. This is not true. The only thing you replace is the points; condenser; and advance weights. Everything fits inside the distributor cap. If you want to research it more go to Genesee products web site. They have the kit for $89.95.
If you decide to keep your points and condenser we need to look at the coil though.
The 6v coil will work but you need to add a 12v to 6v resistor in the wire to the coil. Since you are changing over to 12v for better cranking and a more reliable spark at the plugs I think it is best to replace your old coil with a new 12v coil. This is also something to think about if getting a kit. Most kits come with a 12v to 6v resistor. If you want to put in a 12v coil you will need to throw away the resistor and buy a 12v coil locally.
To get the right one we will look at this in detail. A 12V coil really works on about 8 or 9 volts so it must have a resistor or some form of resistance in the wiring.

The first type and the most common one is with a external resistor. They put the resistor on the out side of the coil so they can bypass it and give the coil a full 12V shot while cranking for easier starting. That point is really mute on these tractors because we do not use the starter relay needed to do this. Remember I told you the starter relay from the car parts store does not work on these tractors with a grounding starter switch. While these coils are easy to use; work very well; and may cost less; I try not to recommend them because of the added resistor needed in the wire. If you do not have the resistor that goes with your coil it will not work properly and you will be replacing coils because they over heat and burn out or do not get enough power. This is why I recommend you use a coil with the internal resistor. It is just easier on me to tell you how to wire the internal resistor coil. If you get a coil that needs a external resistor and get the proper resistor to go with that coil you just need to wire the resistor in the wire from the terminal block to the coil so it cuts the power to the coil. This resistor will get very hot during use so mount it so it does not burn any wire coating or such.

The second type is a 12V coil with a internal resistance caused by extra wiring in the coil. It will be marked “No External Resistor Required” or something similar. If it is not marked it is NOT a internal resistance coil and will require a external resistor. This point is very important if you are buying a kit that has a coil included. My AutoZone store did not have this coil in stock. It is not a very common coil because like I said auto manufactures like to use the external resistor coil so they can bypass it during start up. I did find some at my local NAPA store. The cheaper (notice I did not say cheap as in inferior) brand had a part # of IC14-SB $13.99. If they do not have this one you could get the Echlin brand part # IC14 but it cost more.

[Log in to Reply]  [No Email]
john in la

11-15-2004 05:34:39


Report to Moderator
 Wiring and Gauges in reply to john in la, 11-15-2004 05:32:11  
Wiring and Gauges
Lights;
All light bulbs will need to be replaced with 12V bulbs including your dash instrument light.
The fuel gauge will need to be replaced with a 12V gauge but the old 6V sending unit in the tank will work.
The oil pressure and water temperature gauges use no electivity so they can stay.
Your amp gauge will need to be replaced so let me recommend you replace it with a volt gauge. Volt gauges are much better for these tractors.
You will need a terminal block that is mounted under the dash. If yours is shot you can get one from AutoZone for about $3.00. Some have only one screw per circuit and some have two screws joined by a short piece of metal. You will need a terminal block with two circuits. One circuit for the power side of the key and one circuit for power only with key on.

So now we have all our parts installed on the tractor and it is time to wire every thing together.
Print out this wiring diagram so you can follow along.

third party image

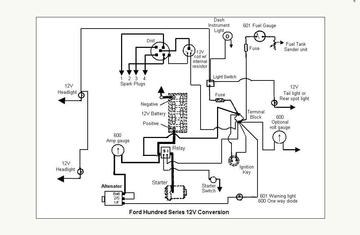
While we will wait till last to install and hook up the battery lets start with the biggest wires first.

Battery cables;
Battery negative post to a good engine ground
Battery positive post to the left side of starter relay
Right side of relay to starter

10 Gauge wire;
Alternator battery post to the left (battery) side of relay. You can put your amp gauge in this wire if you are going to use one. If you hook it up wrong and it reads backwards just remove and install the wires on the opposite post of the gauge.
Left (battery) side of relay to the hot side of the terminal block.

All the rest of the wires are 12 gauge. While you may be able to use 14 gauge wire I always use 12 gauge wire as it does not cost much more;

Hot side of terminal block to……..
Key
Inline fuse and then to light switch and lights.

Power only with key on side of terminal block to…..
Other side of key
Positive side of coil. This is the wire you need a resistor in if you are using the 6v coil or the 12v with external resistor.
I post on starter relay (Note; if you have the 3 post starter relay just leave this wire off)
#1 of F post on alternator. This is the wire you need a warning light or a one way diode. Some way to break back feed from alternator.
Volt gauge if you are using one.
Inline fuse and then to fuel gauge

Almost done. Now we need a 12 gauge wire from…….
The #2 or S post on the alternator to the battery post on the alternator
Fuel gauge to the fuel sender
Negative side of coil to distributor points
S post on starter relay to starter switch on the transmission

Now you can hook up the battery and start it up. Check to see that the fan belt is running correctly. Take a volt meter and set it on 20 volts DC. Put the red lead on the positive battery post and the black lead on the negative battery post. You should have a reading of 14 volts give or take 0.5 volts. If so you are charging and it now time to set back and enjoy you new 12v system.

[Log in to Reply]  [No Email]
john in la

05-26-2005 15:38:19


Report to Moderator
 Re: Wiring and Gauges in reply to john in la, 11-15-2004 05:34:39  
I have been told that the wiring diagram in this post is hard to read so I have a couple of wiring diagrams to add that may be easier to read.
Try these and see if they are better.


[Log in to Reply]  [No Email]
john in la

11-15-2004 05:33:06


Report to Moderator
 Disclaimer and Thanks in reply to john in la, 11-15-2004 05:32:11  
Disclaimer
While it has taken me a long time to put this info together it will be worth it if I can help make your 12v conversion easier. I have tried to include part #’s and prices when ever I could. I have not bought every one of these parts and have got some of this info from other sources. While I believe it to be true I can not guarantee it. This is why I have tried to explain how a part works so you can check it out for yourself when buying. I have also read over and over this post before posting it to try and make sure it is correct in every way but I am human and mistakes do happen. I would ask that anyone that sees a mistake to point it out so we can all see it. I would like to also thank all the guys on the Ford Tractor Board of YTMAG for their help in putting this together.

John in Louisiana

[Log in to Reply]  [No Email]
Ken in KY

09-12-2005 19:37:32


Report to Moderator
 Re: Disclaimer and Thanks in reply to john in la, 11-15-2004 05:33:06  
I'm trying to convert a 6V to 12 801. When you refer to terminal block I'm unsure where it would be located. I'm using a 1 wire alternator, a new coil but it has an external resistor. The schematic that came with the alternator is really confusing. Thanks in advance for any help


[Log in to Reply]  [No Email]
Fighting suburbia in NC

11-16-2004 09:50:25


Report to Moderator
 25 years of wrenching distilled...... in reply to john in la, 11-15-2004 05:33:06  
Very good job, John in La.

Thanks for the effort, I am sure it will help numerous old iron users in the future. This write-up is now saved as a file and will be printed out and put into the binder for the old girl. In fact, I am going to e-mail to a friend of mine with an old Allis AC that has a butchered wiring harness that needs to be straightened out before it lights off and burns something up.

For the less inclined types the complete conversion sets are probably the easiest way to accomplish the goal. After piecing several conversions together over the years from whatever was to hand at the time this write-up really ties it all together. My hat is off to you for the effort.

Now go out and hop on a tractor and take a ride, you deserve it..... ...

[Log in to Reply]  [No Email]
txblu

11-17-2004 07:24:00


Report to Moderator
 Re: 25 years of wrenching distilled...... in reply to Fighting suburbia in NC, 11-16-2004 09:50:25  
Iffin you don't mind sharin, how did you save it to a file; click on each piece and "save it to a file"?

thanks,

Mark


[Log in to Reply]  [No Email]
john in la

11-17-2004 15:02:41


Report to Moderator
 Re: 25 years of wrenching distilled...... in reply to txblu, 11-17-2004 07:24:00  
Mark;
Open the entire post by hitting expand on the orginal post.
Go to file (top left corner)
choose save as
When the new window opens hit the drop down arrow and choose where you want to save it. ( desk top; my documants; ect)
Click save

It will save the entire post to you computer.

Now..... ..
I did think about sending this to kim so it can be added to the articles.

On second thought after typing what I was going to say I think it is best to do it this way.

Send me a e-mail at
jpfmcf at yahoo dot com

I can tell you some things I am thinking about as to posting this and you can give me some feed back.

John

[Log in to Reply]  [No Email]
Richard H.

11-15-2004 10:52:23


Report to Moderator
 Re: Disclaimer and Thanks in reply to john in la, 11-15-2004 05:33:06  
WOW, I"m I"m well... Speachless... What a Job !


[Log in to Reply]  [No Email]
BillB

11-15-2004 09:21:31


Report to Moderator
 Re: Disclaimer and Thanks in reply to john in la, 11-15-2004 05:33:06  
John, I will be doing this to my "55 650 next year.
Thanks,
Bill


[Log in to Reply]  [No Email]
txblu

11-15-2004 06:45:10


Report to Moderator
 Re: Disclaimer and Thanks in reply to john in la, 11-15-2004 05:33:06  
John,

You do good work dude.

This ought to get published and added to the "Manuals" section so that it doesn't get lost in the archives. This will be useful for lots of folks for lots of years.

Mark


[Log in to Reply]  [No Email]
[Options]  [Printer Friendly]  [Posting Help]  [Return to Forum]   [Log in to Reply]

Hop to:


TRACTOR PARTS TRACTOR MANUALS
We sell tractor parts!  We have the parts you need to repair your tractor - the right parts. Our low prices and years of research make us your best choice when you need parts. Shop Online Today. [ About Us ]

Home  |  Forums


Copyright © 1997-2023 Yesterday's Tractor Co.

All Rights Reserved. Reproduction of any part of this website, including design and content, without written permission is strictly prohibited. Trade Marks and Trade Names contained and used in this Website are those of others, and are used in this Website in a descriptive sense to refer to the products of others. Use of this Web site constitutes acceptance of our User Agreement and Privacy Policy

TRADEMARK DISCLAIMER: Tradenames and Trademarks referred to within Yesterday's Tractor Co. products and within the Yesterday's Tractor Co. websites are the property of their respective trademark holders. None of these trademark holders are affiliated with Yesterday's Tractor Co., our products, or our website nor are we sponsored by them. John Deere and its logos are the registered trademarks of the John Deere Corporation. Agco, Agco Allis, White, Massey Ferguson and their logos are the registered trademarks of AGCO Corporation. Case, Case-IH, Farmall, International Harvester, New Holland and their logos are registered trademarks of CNH Global N.V.

Yesterday's Tractors - Antique Tractor Headquarters

Website Accessibility Policy