There ain't no way to done it but to done it!

Ultradog MN

Well-known Member
Location
Twin Cities
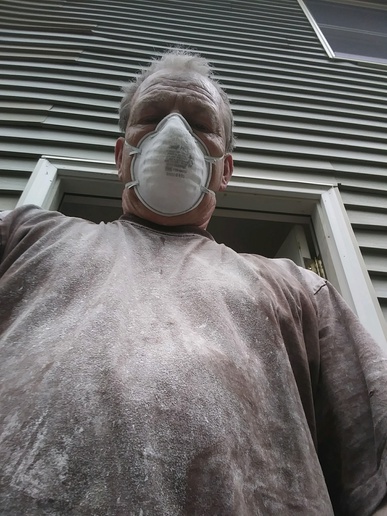
New rock and mud on 4 walls and the ceiling in a 12X17 room.
Just finished sanding it out and it's ready for primer.
Hot and sticky today too.
Not my favorite task.
It took about an hour and a quarter.
There's other ways nowdays but I still do it by hand. It does the nicest job.
a269049.jpg
 
Feels good to get the job behind you. Around here I see guys mudding ceilings while walking around on special stilts. Yes, that gives them the height and speed they need, but I imagine they can't feel that great at the end of the day--both neck and knees get a workout.
 
(quoted from post at 20:25:56 05/30/18) I learned a long time ago when doing drywall, that you have to be a "master trawler"--- not a "master sander".
Loren
o true!
 
I don't mind hanging the sheet rock, but I hate finishing it.
Put up the ceiling in my 32 x 32 garage 15 years ago.
Still not mudded, just painted ceiling white.
 

2-3 years ago a friend twisted my arm into helping him hang some rock. When I got there he had already hung most of the bottom course on the walls. I explained to him the conventional top down sequence, but he was not concerned. He then, despite my objections, fit many small pieces in to use them up. He told me later that he found a guy to mud it for very shot money, and he moved out before the edges of the ceiling could sag.
 
(quoted from post at 04:42:49 05/31/18)
I explained to him the conventional top down sequence

Guess I learned it differently.

The way I learned it, you start with the lower panel. That way you have control over the amount of gap at floor level.

Full sheet at the bottom, then full (or close as possible) sheet at top (leave 1/4" gap), then fill in anything in the middle. The reasoning here was, it's easiest to mud this middle section.

If the middle is just a thin strip, then supposed to cut the top by 12" or so, then fill in middle. This allows ample material for securing to studs.

....And THEN you have the folks that like to run drywall vertical, with vertical seams. In the end, it's the finished product that matters. I'm just glad never had to tackle any f them 4' x 12' pieces! *lol*
 
Book in Home Depot :" you can tackle your own electric and plumbing but unless you want your walls to look bad ,hire a qualified drywall finisher."
 
(quoted from post at 07:35:39 05/31/18)
(quoted from post at 04:42:49 05/31/18)
I explained to him the conventional top down sequence

Guess I learned it differently.

The way I learned it, you start with the lower panel. That way you have control over the amount of gap at floor level.

Full sheet at the bottom, then full (or close as possible) sheet at top (leave 1/4" gap), then fill in anything in the middle. The reasoning here was, it's easiest to mud this middle section.

If the middle is just a thin strip, then supposed to cut the top by 12" or so, then fill in middle. This allows ample material for securing to studs.

....And THEN you have the folks that like to run drywall vertical, with vertical seams. In the end, it's the finished product that matters. I'm just glad never had to tackle any f them 4' x 12' pieces! *lol*

I learned to start with the ceiling and work down. The rock on the walls holds the edges of the ceiling rock. You put the upper sheet on the wall first being sure the it is supporting the ceiling. Besides supporting the ceiling, it puts the horizontal joint lower where it is harder to notice. Then you cut and apply the lower piece with it tight against the upper. and no one will ever see if the bottom is a little shy.
 
Yup, you're right on the top-down. Been too many years. ...On the other hand, not enough! *lol*

Ceiling first, and THAT has a 1/8" to 1/4" gap. Then the upper wall panel, which butts up to the ceiling and helps hold it in place. Then the bottom piece, then fill in between.

The gap at the floor is preferred to allow floor covering to go right up to or slightly under the walls.

Think I've only hung drywall on a ceiling about 3 times. Most of my work was repair work to walls, so ceilings were already up.
 

We sell tractor parts! We have the parts you need to repair your tractor - the right parts. Our low prices and years of research make us your best choice when you need parts. Shop Online Today.

Back
Top