Block wall - or how I spent August-September

Dave H (MI)

Well-known Member
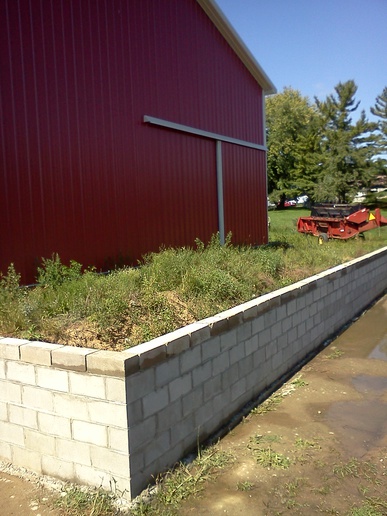
Back in June of this year I asked for advice here on how to do a block retaining wall on the east end of my barn and received some really excellent responses. I watched some YouTube and read some websites also. Here is a picture of the finished wall...or nearly finished. Even though I liked it bare, I put some white paint on the outside which I expect to weather and peel and look rustic. Footing is well below frost at almost 4'. Rebar comes vertically out of the footing. The third course is a bond beam reinforced with rebar and tied into the verticles. Also tied into the bond beam are 6-7 horizontal rebar that go straight back into the soil 5' behind the wall. Each of those has a large concrete rectangle poured around the end of it that tie the wall into the backfill. Like a "dead man". Hope I did this right. If there are any glaring errors, just don't tell me. I will worry about it all winter. What's done is done. :)

In the background is the 820 combine head. Just got that on the combine and checked that it works. Behind that is what used to be the neighbors house. We bought them out a year ago. Got some great trees in the deal. I think that is Tom O'Conner'ss old truck back there on the drive...or my pickup...same color. Anyway, thanks for the advice. It was a great project and I was in better shape when I was done than I have been in years!
a241097.jpg

a241097.jpg
 
Looks good, seems like you were able to keep it nice and straight/plumb. Per your description, it seems like you reinforced it well too.

Only thing that I am curious about is the top course. Is that a coping stone or something similar? Reason I ask is its a good idea to keep the top of a wall like this from allowing excess moisture in, with the freeze/thaw cycle concern. Looks like solid concrete blocks that still need to be mortared in from here.

That corner sure looks perfect !
 
sounds like you were on the right track with the deadman. I general the deadman should be outside the area of a 30 degree angle back from the bottom of the footing keep it out of the active pressure zone of the soil --- inside the active pressure zone it gives a partial resistance---the footing being deep in the ground gives a lot of resistance to horizontal sliding---great looking wall!
 
Looks good. Did you happen to put a drain tile in to let the ground water escape? I only say this because I had to hall away a wall like this once because of the hydrodynamic pressure blew it out. I never could get the hang of using the butter kife or trowel [ depending on the old guy's you try to learn from].
 
It doesn't get a lot of moisture due to the siting of the barn and how the other walls are retained. But, yes... it has drains down low. The long wall on the north is made of landscape timbers because I move equipment back there and they are more forgiving of a "bump". The long south side is an embankment made of almost all sand with a topsoil cap and is planted with grass which I mow. The short west side is level with the ground. So basically the watershed splits and goes around the barn and rejoins in the cultivated field on the other side.

I was not familiar with the concept of hydraulic pressure until the 100' wood wall on the north that I built last summer collapsed from the pressure this Spring. I rebuilt it, fabricated steel deadmen that wrap behind the barn posts, and installed a drain tile that diverts the water outside the wall. Big friggin job!
 
Fair question. I can do a block wall alone with my cement mixer and a small tractor. I like the way block looks better. I wanted to learn how to lay block because I have a future project that requires more advanced block skills. It doesn't have to be done in one day. AND, if you watch the sales for mortar and block, it is cheaper than a poured wall...mostly because of labor and delivery. To name just a few. :)
 
You made my night! And here is why. The post that you put up for me back in June I saved to a Word file and used as my basis for the work I did. Also a couple others, but yours was the most detailed. I spent a good amount of time on that corner because it was the "perfect" level for the other two directions and because I wanted to walk by it daily and be happy with it.

Here is the story on the top row. Those are solid concrete blocks. I needed the wall to be a specific height and that required a certain size block and I wanted them solid to exclude water. Problem is, they are REALLY heavy and not at a comfortable height. Even after weeks of working with the normal blocks, these were giving me trouble. So I decided to make my life easier and not try to mortar the ends. I filled those in a few days later with a mortar bag. They are filled up now and water cannot get down into the wall from the top.

Thanks for taking the time to help me back in June. Your advice was used to good effect. The wall has a run out in the center of about 1/8-1/4" because the string gave me a little trouble. Level all the way across. I made a major mistake at one point, but figured a way to fix it and you would never know and I am not confessing! :)
 
I'm 58 and I felt like a kid again after a couple weeks of schlepping all that around. The LIGHTEST material you work with is the water...you have a hose.
 
Hi Ray! So the overall length was 60' and I could do maybe 2/3 course in a day. More if I could get out there earlier. That includes mixing mortar. Next year I move up to the new property. There is a really good concrete footing that extends over 5' into the ground and is the remains of an old gambrel roof barn. The only thing still standing is part of an end wall and the milk house. Storms took out the rest. I have photos of the original barn and I am going to rebuild it. Barn was block going up 11 courses. 5 windows and a man door on each long side. One end had large doors. Overall was about 50 long, maybe 25 wide. After the block layer comes post and beam wood construction. Going to be a 2-3 year project. No rebar in the footing so I am going to epoxy some in. The original barn used pilasters as do most of the older barns in the area. I have done some post and beam work in the past. Should be a fun project!
 
How have you directed roof runoff from your barn? That is a lot of water concentrated within the raised area within the retaining wall.
 
Wall looks great! Know if you want to set it off put limestone on it. Place the limestone vertical instead of horizontal. I have a landscaping friend that does that and it looks impressive.
 
The retaining wall is on the east side only. West side is at ground level and graded to run north and south. North wall is landscape timbers with pea gravel and drain tiles that run any roof runoff out and around the block wall. South side of the barn has a stone catch basin/trough that diverts water around the block wall. Overflow from this runs down a berm and across the lane into the fields. This was tested before the block wall was back filled. We had two rainfalls in excess of 4" in a few hours and never had more than an inch of water behind the wall. Believe me, I really gave a lot of thought to hydraulics when I built this wall!
 
LOL - nah he's got the top ends buttered in now, and the top course being solid, that is going to help.
 
Really glad just to be of some help, and I thank you for the kind words!

With the top course finished, and with the wall being solid with sufficient drainage, it will be fine.

Those solid ones are heavy and not easy to butter the ends when setting like brick.

That's within tolerance, more than likely only would know its there as I'd bet you just can't see it easily if at all, more so because its low, not at eye level. Its also part of the work, figuring out how to correct or hide a mistake. Used to hear that about carpenters, and that one can be measured by how well they hide the mistakes, given wood being a natural material and all.
 
Wet the blocks and sprinkle ironoxide on it. We built a 3' retaining wall from recycled concrete from our drive. Misted stone with water, sprinkled lots of ironoxide on. We have been asked where we got the old sandstone.
 

We sell tractor parts! We have the parts you need to repair your tractor - the right parts. Our low prices and years of research make us your best choice when you need parts. Shop Online Today.

Back
Top