Category 2 Hitch (implement layout)

Billy NY

Well-known Member
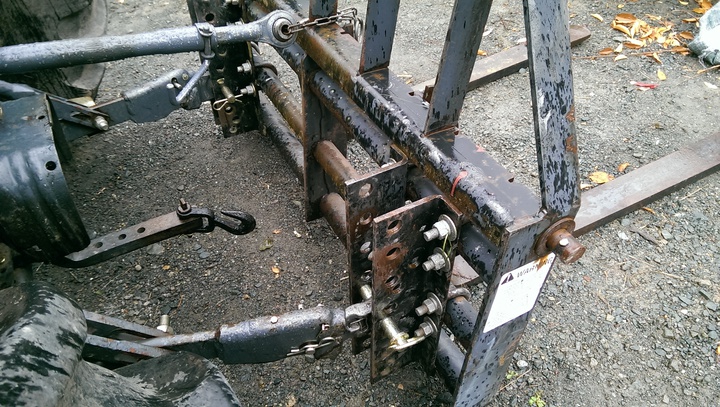
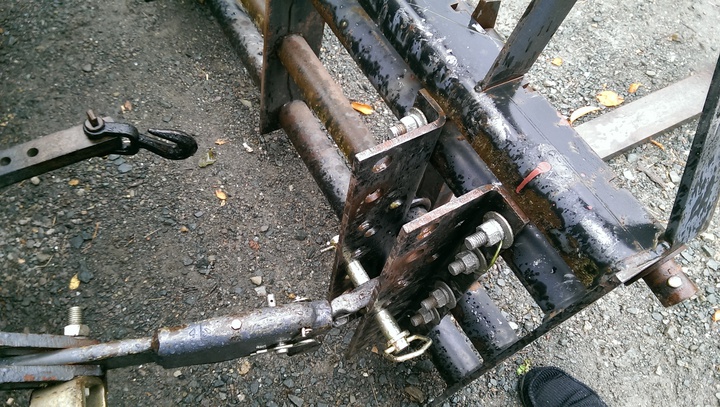
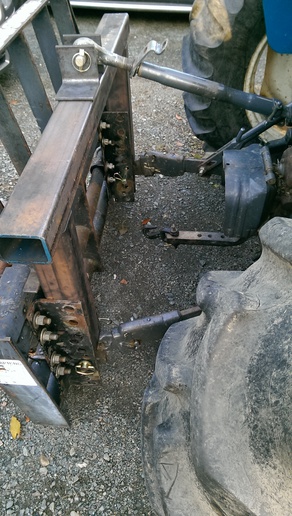
I am building a set of forks for a 3 point hitch and am going to make it a true category 2 implement. Photos will show the brackets I have to create a flange that the lift arms will be received by and will be pinned through to complete the lift arm connections.

I've perused diagrams showing dimensions for Cat2 on the web, but what I am wondering, with this type of arrangement, where I should center the lift arms so what I build works universally on a cat 2 hitch. Diagrams seem to lead me to believe 32 1/2" is the center to center from each lift arm, but does that cover what it needs to reach to each side of a lift pin on an implement, you know what you need to swing past the pin, then back onto the pin ? You need extra space to do that when lined up to an implement to get the arms connected. Is there a typical, outside of lift pin to lift pin dimension for category 2 ? I then suppose once connected and you push the arms onto the pin to abut the inside of the arms against the base of the lift pins on the implement, that would work universally and could be used to center a flange connection like I am building.

I see Speeco has a quick hitch, and it receives the lift arms the same way, in a flange that a pin runs through. The center of that flange is what I am after, and I thought of contacting them for that dimension, but thought it a good one to post here just the same. It seems I could use one of these quick hitches, would hate to build my implement and not have it fit one of those.

I just want to make sure once I build the top link mast that will bolt to the flange connection as shown mocked up in the photos, I do not make it specific and only fit to this tractor, or be off enough to not work. I realize these are standard for 50 years or so now.

I can adjust the brackets each way.

I also have just picked up an McConnell Manufacturing Co. Inc. 7' 3 pt Cat 2 rear blade for snow removal, cheap way out to make use of this tractor for snow. Its a really heavy well built blade, and vintage, early 70's though I can find nothing about it on the web, was made in Prattsburg, Steuben County NY. I am wondering if I should just mirror the dimensions on that implement, at the lift pins and center my lift arms where the abut the base of the lift pin. I already have the 24" center to center of lift pin to top link pin established.

Any thoughts ? Thanks in advance !
a205727.jpg

a205728.jpg

a205729.jpg
 
It looks to me,that your top link will hit the cross brace under neath it self as you raise the implement up.Jig it up in the raised position to see how it works thru its travel up and down.Mark
 
If you ever want to get a quick hitch, that top link would be better if it were open to the bottom, so the big hook can catch it. If your geometry can work to have the angle iron brackets rotated 90 degrees to the front of the beam?

It would look like your top link is quite high as well, might just be a camera angle. Measure on your tractor by the axle from a bottom hole to the top link hole, your holes on the implement should be the same vertical distance so the thing lifts level, not in an arc.

Paul
 
That's just a rough mock up, its not nearly set to where it needs to be, which is even higher actually, but per cat 2 dimensions center to center, lift arm pins to top link pin.

I'll set the 2 uprights/posts with a mark across the tube for height, per my fab sketch where I worked out the details to get the 24" center to center vertically. I'll then clamp/match mark the flange holes, center punch, drill same, fasten, then I can set the width, with the brackets, then lay the top piece across and weld the top link flange.

The way its laid out, per the JD cat 2 diagram and others off the web that seem to match what JD had, it has the top link hole 24" center to center from the bottom lift pins, per the drawing, and they are in the same plane vertically, centered top to bottom at 24" It's possible I could rotate the angle down, adjust the height, but to maintain the holes in the same plane, I don't know if it will be an issue as I don't think I have adjustment that way with it orientated like you mentioned. I'd have to off set the top horizontal piece somehow. I do see the value in doing this, exactly like you said, to catch that top hook, its going to work better for sure.

As shown, I could live with hooking it up without the top pin installed and could reach it from the seat, then just pin it after the hook is in place.That kind of defeats the purpose but really not all that bad either seeing I can reach it from the seat. I have other implements that likely would be worse with the top link connection and a quick hitch.

I don't necessarily need the quick hitch, given I don't switch implements all that often, but it would seem to be real handy when you do, hence my consideration in this small build.
 
Its likely just the picture, but I agree, measure twice, mock it up and see how it works first before its set. The uprights actually will be raised up, making the top link connection higher than shown. I have 2 holes on each bracket that are in the same plane, so I used those for the 1" bolts that will fasten the uprights to the flanges on each side, pinning it in place. The top link geometry is just set there, its not pinned to the tractor and its actually reversed to, just to mock up for a photo. The uprights will be marked at 11 7/16" above the brackets and will allow for the 2 aligned holes and actually a 3rd below it, but not in the same plane vertically. The top horizontal is included in the dimension tally to provide the 24" needed center to center vertically lower and top link pins
 
What is -really- handy is a hyd top link.

I got one for my little compact loader tractor cat 1, wow is that nice.

Then one came with my Tebben 3pt forklift mast

http://tebben.us/cpms/uploads/forklift.pdf

And wow is that nice with a forklift, to be able to tilt it. I also use the cat 2 hydraulic upper link on other things now.

I would really consider getting a hyd upper link.

Paul
 
That is in definitely in the works next, seeing I have some options to connect to either the 2 pair of remotes or tractor hydraulics. That would make these shine for tilt, no doubt, as without you have to set the top link just so, to get decent tilt and still be able to slip a fork under something.

That is a nice set up in the link, be nice to see more photos, I attached the link below.
Tebben
 
My top link is on top same as what he has it was built by local machine shop. It's kinda handy the way he has it you just lay the link down and raise the arms till it lines up. But I can see where it wouldnt work on a quick hitch.
Side note the guy I bought it from didn't think I should buy he said it never catch on I'm getting old
 
If you can look at the spedco quick hitch why not buy it or measure it then fit to that. If it will fit that it would be standardized. Like said the top link needs to be in front for the hook on a quick hitch.
 
Kind of glad I posted this here and got some comments about that. Seemingly per the Cat 2 dimensions shown on drawings, (works on paper lol... we all know how that goes) the lower lift pins are always shown in the same plane vertically. So I designed this per that, but if the top link pin is forward towards the tractor, than the bottom pins, I don't see any issues with that, well maybe the top link adjustment range if that is a plausible concern, maybe its just fine that way too.

The key to this implement without a hydraulic top link is to have that sweet spot mechanical/threaded top link setting so that when fully raised its got adequate tilt to retain a log or the cargo, and when its lowered to the ground, its at least level or you can slip under whatever it is you will carry without any adjustment to the top link needed. I'd really like to clamp this together and check that before tacking or welding but I may have to tack it or weld tabs on the uprights to clamp to. My previous set, built much lighter, Cat 1 geometry, same length forks or close, with the top link pin aligned with the lower lift pins, did in fact have an ideal one time setting on the top link to accomplish the above and its why I'm sort of stuck on it LOL ! Make sense or am I over thinking LOL ?

But, needing this done yesterday...... and not over think... LOL. I should re-work the dimensions on paper, top link connection on the face, not the top, make sure it works with the steel I have already, or perhaps just switch the top piece to a 4"x4" 1/4" tube so that the top link flange connection (3/8" angle) I have punched will match as they are 4" Or, I'll replace those too, as those were designed to fit on top, precisely on center at 24" from the lower pins, the hole is off set back to match the plane of the lower pins which is dictated by the brackets that connect the posts or uprights. So its not centered in the flange, but still seems to be enough edge distance, that top link pin won't gall, deform or oval out etc. So they may not be centered, look off, but would work just fine.

Now, as is in the photo, and I don't have to necessarily have a quick hitch, (this alone will carry/move any implement I have) the top link should clear the horizontal piece as its exactly per Cat 2 drawing/dimensions. If not, I guess I'd best find out before welding if it is to remain as is.

Well hey, thanks ACG and all others for taking a look and commenting, sure glad I did not rush this, and certainly wish I could have added the hydraulic top link now, just that money went for a nice rear blade to get me through the snow and allows me to have both, they are equally important tools I need.
 
i agree with Paul.you'll want hydraulic top link when using it as a forklift,instead of always having to adjust top link on varying terrains.
 
Thanks for posting that Dave, somehow I never found that on the web, will take a close look and see what I have. Much appreciated !
 

We sell tractor parts! We have the parts you need to repair your tractor - the right parts. Our low prices and years of research make us your best choice when you need parts. Shop Online Today.

Back
Top