Elementary Electrical

equeen

Member
Yep, I'm an elementary electrical(Pre-K) sort of guy; but here are the questions:

1. IH "Out to run", "In to stop" ignition switch has two wiring terminals. I see no markings identifying either terminal in any way. Thus, is it proper to wire from the ammeter to either ignition switch terminal, then all other wires to the other terminal?

2. I've seen a wiring diagram of a fuse in the wire between "BAT" on alternator to the ammeter. Is this necessary/helpful? If so, what type of fuse/holder?

3. Alternator #1 spade switch wire to ignition.
Wiring options appear to include somewhere along the length of the wire:
A filament style marker lamp bulb, or
A 15 ohm resistor, or
A 3 amp 50 volt PIV diode

Of course I could be confused with the above, but my question remains......
What is the purpose of something in this stretch of wire?

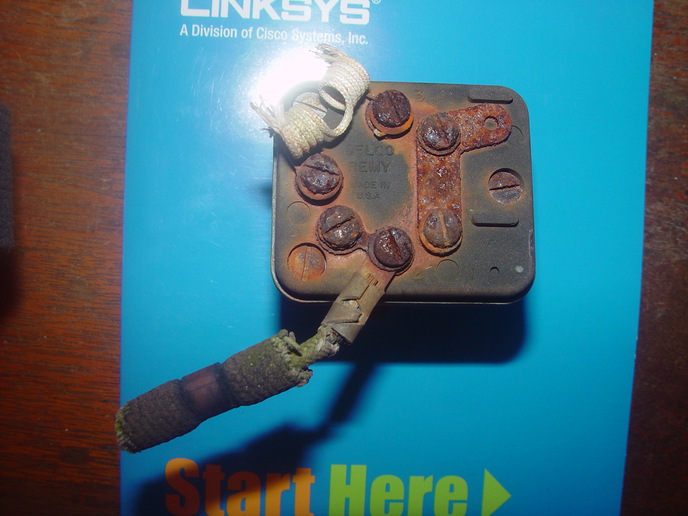
4. And, while I'm at it... how do I properly wire the original Delco Remey light switch (photo above)on the Farmall?

Term 1...
Term 2...
Term 3... (Is the #3 post on the L shaped piece of metal with 2 screws in it including the screw for #1 post?)
a53071.jpg
 
I think Bob M has a good picture of that switch and what wires go where, I'll let him or others handle that part of your question and I'll just address this one:

3. Alternator #1 spade switch wire to ignition.
Wiring options appear to include somewhere along the length of the wire:
A filament style marker lamp bulb, or
A 15 ohm resistor, or
A 3 amp 50 volt PIV diode

Of course I could be confused with the above, but my question remains......
What is the purpose of something in this stretch of wire?


ANSWER:

OKAY, voltage is required to the No 1 terminal (on the GM 3 wire 10 SI alternator family) in order to "excite" the alternator prior to sufficient RPM such that it becomes self "excited"

So, why a diode or resistor or incandescent idiot light???

One or more of those are required becasue if you feed that No 1 terminal from the ignition system, like the IGN output on an ignition switch or the high input (NOT to distributor) side of the coil or the high input (NOT to coil) side of a ballast resistor THE TRACTOR MAY CONTINUE TO RUN AFTER YOU TURN THE IGN SWITCH OFF because the alternator might still back feed the coil i.e. independant from the ign switch.

NOTE Ive seen this work with no resistor at all in that wire, it depends on the idle RPM and other factors but many tractos would run on without this feature

I suggest either an incandescent lamp or a resistor as they provide at least some small degree of current limiting versus use of a diode like most use. Also an idiot light (small incandescent tail marker) provides a visual indication if shes charging or not the diode or resistor cant. Also some "dudes" use an idiot light in paralell with a resistor so the alternator still excites even if the lamp burns out.

NOTE some dudes (like if its a diesel) rig up an oil pressure switch and use it to excite the alternator verus the ignition but id still sue a resistor to give soem degree of current limiting.

THERE YA GO

John T
 
The first one I did many years ago, I used a push button. After it was running just push the button and send 12 v to the alt and wow that works also......
 
John has your #1 terminal covered (as he is as good as we get on this issue!
The Ignition switches (on off) are non specific as to terminals. Neither is grounded, so it makes no difference. One comes from the amp meter load side. one has the ignition resistor (if used) and the wire going to the diode/lamp/15ohm resistor then terminal 1 on the Alt. A diesel on off switch is grounded and has only one screw terminal.
I believe in putting a fusable link in the electrical system protecting the alternator from total melt down if a mistake is made jumping or a short happens. This fuse link is a fuse wire available from auto parts stores it will have (and needs) metal connectors on its ends (spade terminals or such) to place it in the circuit. It is located on the starter switch, and is in the 10 gauge wire supplying the amp meter with connection to Positive from the battery. (assumes you are using Delco Alternator or Hitachi with negative ground as in a modern car)
The amp meter needs to be wired so it shows discharge when the lights are on. (easily tested when connecting the above fuse link with a bulb)
The coil should be wired with the Positive terminal to the ignition Switch, and the Negative to the Distributor. (reversed from the way it came from the factory)
The light switch has three connections one to headlights on one end of the wire wound resistor, one to tail lights on the L shaped connector on right. And a supply from a 20 amp fuse on the one with a wire hanging on it.
To assure my theoretical statement on the light switch (I do not have on in hand)
The knob in the off position (CCW from the Knob point of view) no connection to terminals.
Knob in D position Full voltage to the L shaped metal. and 2.5 to 3 ohms across the input to the correct end of the resistor to put the light wires on.
B position has full voltage to the L metal. and full voltage to the resistor terminal discovered earlier. No ohms between it and supply.
There are diagrams in Bob M diagrams that should make this easy to do.
Best of luck, Jim
 
I found a "Fuseable Link" at an auto parts store today, but two stores carried nothing heavier than 14 ga.

I'm running 10 ga wire and was expecting to find a 10 ga fuseable link; but neither store carried one that heavy.

Do I use the 14 with my 10 wire - or keep searching for a 10 ga?
 
Okay, Radio Shack had a pkt of 5 electronic circuit board type resistors @ 15 Ohm and 1/2 watt. I suppose that the ends of these would be soldered onto each end of a cut wire???

Or, did I get the wrong style/type resistor?

As to the 1815 Bayonet-Base lamp for my "idiot light"....got the lamps, no problem. But the only base the Shack carried for the lamp is one with "solder tabs" on each side of the base. I suppose I can feed each end of the wire into a tab then solder, then tape the base. Is this what you have in mind?

Thanks.
 
Thanks for the kind words but Im not all that alternator savvy remember (Im only 12 VDC certified lol), I dont think I could pack water to you or Bob M or Mayor Bob on alternators in general but yep Im a decent hand on how to excite them rascals.

As "Dirty Harry Callahan" said in his movies, ....."A mans got to know his limitations"

John T
 
THe gauge is the fuse limit. Each brand and gauge and composition is designed around a specific Amps at which it melts. Use a link that is 10% higher than the amp output of your alternator. They usually are stamped into the frame. It will likely be smaller than the wire used to make the circuit. Jim
 
Yes. THe use of the light (especially if done on the electrical box where it can be seen in a small hole with red tape on the inside! can be very un-detectable on first glance, but works well. Jim
 
Thanks, but you had it simple to start with - and I like your fusible link wire approach.

I found a website (www.whiteproducts.com) that helped to further educate me. Notable statements from their website:

"Typically, a given harness segment is protected by a fusible link that is four gauge numbers smaller. A 14 gauge wire would be protected by an 18-gauge fusible link."

So....I will purchase the 14 gauge fusible link to go with my 10 gauge wire. BTW: My alternator is stamped 55A.
 
If it goes Poof, With no reason, use the next size larger! The reason I suggested the plug in fuses was the availability of Amp specs on them. Jim
 
Actually, I plan to wire in stages...

Mount alternator but no wiring to tractor
No wiring to light switch or lights
No wiring to "dash panel" IH 20Amp fuse.

Just wire as needed to get juice to the distributor. If runs okay, then wire the alternator. If runs okay, then wire the 20amp fuse and lights.

...I will pick up a 60Amp plug-in fuse for possible use to replace the "Fuse Link" if it goes Poof.
 

We sell tractor parts! We have the parts you need to repair your tractor - the right parts. Our low prices and years of research make us your best choice when you need parts. Shop Online Today.

Back
Top