I want to change painting methods - Need HELP / SUGGESTIONS

RTR

Well-known Member
Ok guys, I know you all are pretty knowledgeable about this kind of stuff, and after reading the recent thread about primers; I thought I might better ask while its on your mind.

After painting several IH tractors through the years (mainly to refresh them and make them proud to own workable tractors to last for many years), I have decided that I want to start putting a "better" paint job on them. At least try it out so I can look for a difference. I want to try and achieve a somewhat professional look.


Here's the run-down on what I've been doing and pictures to show the result I get.

#1) Take tractor apart enough to do a good looking paint job. Remove sheetmetal, remove radiator on some, and remove attachments, alternator, starter, seat, and all wheels and tires.

#2) Spray tractor down with Easy Off Oven Cleaner & steam clean with high pressure hot water machine. Sand some flaky paint or rough spots on sheetmetal if necessary by hand or with orbital sander.
Scrape some excessive gime & Repeat washing with hot water about 2 more times until it is clean.

#3) Mask off certain areas, and paint exhaust manifold, etc. beforehand and covering with paper to prevent overspray of primary color.

#4) Mix the IH Red Acrylic Enamel paint with medium hardener & reducer and start applying paint to tractor. I put about 2 coats of paint on the tractor and sheetmetal. Maybe a little more on the sheetmetal after I get through and have paint leftover. The paint is mixed from the local Automotive Paint Supply Store and is around $120 a gallon.

#5) About 2 to 3 days later, I reassemble the tractor and get everything together. About 2 to 3 days after that (roughly a week after paint), I apply the decals.

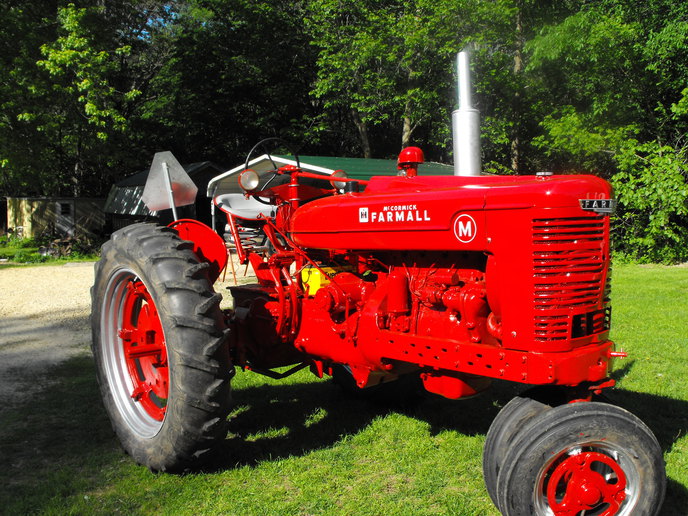
#6) Here is the result. It looks good, but definitely not show quality. I understand pictures are hard to tell.

* For my next tractor (Farmall 140 & Ford 641 Powermaster), I am wanting a very nice SLICK paint job. At least the sheetmetal.

2555.jpg
2556.jpg
2557.jpg
2558.jpg
2559.jpg
2560.jpg
2561.jpg
2562.jpg
2563.jpg
2564.jpg
2565.jpg
 

I would also like to add that I am using a top load paint sprayer from Harbor Frieght. I've had it recommended by professionals, and think it sprays pretty good. I actually replaced it with a new one, after using the other one for about a year. Painted about 12 tractors with it before buying the new one.
 
Also forgot to mention that for the upcoming Farmall 140 and Ford 841; I am going to have the sheetmetal, fenders, and dash panel sandblasted. I feel like that will contribute to a better finished product.

I just need some help/ideas/suggestions on what to do after that. Maybe its something I'm doing and need to tweak, or its something I'm not doing. THANKS FOR THE HELP!
 
Wish mine looked that rough.You should give a warning to put on sunglasses before looking a shiney red tractors. I think you do a good looking job.
 
I would like to hear some opinions on applying several clear coats over final paint? Specifically over the Tractor and implement paint available at Tractor Supply and other Farm stores. Don't mean to Hijack your post but wondering how it would look and last over time.
Tod Michigan
 
I use IH paint 2150 and I have good luck with it. I give it two coats lightly and the last one real heavy so as not to run.
a46893.jpg
 
By the way, I wouldn't change a thing, I think your work looks great just the way it is. Shiny tractors are always taken better care of so they last longer. I'd pay you to paint my Tractor any time. Looks good.
Tod Michigan


Thank you all so much for the kind comments! I have had people come look at them and like them, and I've had several people come look thinking they are "show" tractors. They arrive to look at it thinking it is supposed to be perfect. I had one guy pass the cub up with the blue cultivators (pictured) becuase he didn't think the paint job was very good. I agree it doesn't has the gloss like it should. It has somewhat of a rough surface rather than slick. But I never advertise a tractor when I decide to sell one as show quality. I also had a guy knock me AFTER he drove the tractor and tried EVERYTHING on it to see if it worked (down to cutting doughnuts in the gravel trying out left and right brakes). He got off it, and tried to cut us down on the price by $800 because he said the paint wasn't as good as the pictures, and that the headlight decal was slighly off center (those are the hardest to place because they're semicircle, but the most obscure).

I'm wanting to get more of a gloss and smooth to the touch finish than what I'm getting. I am needing some help since I will be sandblasting all the sheetmetal, dashs, and fenders. I figure maybe some primer and special sanding would help. Maybe some sanding or buffing after paint? I really don't know, and thats where I need the suggestions. What to do, how to do it, and what products to use. THANKS AGAIN!
 
Looking at that left fender in photo number 2. If I were judging that on a scale of 1 to 10 for paint I would give it a 3.
You just painted over pits and bumps and God knows what else. Sparrow poop?
Here is a good place to learn prep for paint.
Take thefenders to a sandblester and get them done.Check them over and weld any holes or cracks. Hammer and dolly any major dents
Within 24 hours spray them with epoxy primer . Just a cover coat. Use the dark gray.
Fill low spots with bondo. Fill pitted areas with bondo.
Using board sander and 80 grit paper sand the bondo down til you see the dark gray.

Now 3-4 good wet coats of primer sufacer. Board sand and DA sand with 220.
One more time prime and wet block sand with 360
Wipe down with prepsol, wipe down with tack rag. SHoot your color coats, letting the paint tack between coats.
That fender sould look like someone just took if off a 2010 GMC Sierra.
If you don't have at least 16 hours of labor in the pair you rushed the job.
 

Ok, this is a start. Thanks for the comments. That fender actually was pretty clean. It had a smooth surface of the old faded/chalky paint. After steam cleaning the tractor a few times we painted it. I agree about the sandblasting. I have also had the same paint results on New Metal. Take the battery box sides for example. Those are made by me out of slick new 10 gauge steel. I put some rattle can red oxide primer on them after building them so they wouldn't rust. Still got the dull, rough paint results.

As far as the terms you're using with the sanding, I'm not sure what you mean. And also the methods I'm not sure of. I apologize for being so ignorant of the terms, but again I'm learning.

I'm guessing I should do this technique for all of the sheetmetal thats sandblasted.
 

I have a body hammer and dolly and use that when I can. The Bondo doesn't work as well as I'd like it to. For me, it isn't easy to work with and smooth out. Maybe I am not applying enough to the peice I'm working with. It seems too thick when trying to work with it, and it also "rubberizes" before it hardens VERY QUICKLY AS SOON AS I APPLY IT. Maybe I am putting too much hardener in it, but I put VERY LITTLE. (about 1/4 to 1/2 inch strip of hardner for a golf ball size of Bondo)
 
I agree with Paul on the sunglasses warning. I think you are just looking for an "excuse" to post pics of your shiny tractors...any of which I would be proud to park under my shed!! Just can't figure out why you want to hurt people's eyes!!

Rick

ps: You WILL continue to post pics...under threat of expulsion!!
 
Gordo's method is pretty solid. His example of the fender seems to be right on IMO. You can see that there were spots that were down to bare metal and other spots that had existing paint and primer on them. You have to go down to bare metal (on sheet metal) if you want a good finish.

You should use a high build primer and block it out if you want a good, smooth finish. An important thing to remember is paint fills NOTHING. It actually magnifies most imperfections. If your primed and blocked surface doesn't look just like you want your painted surface to look you have to keep sanding and priming. Body filler for minimal filling never hurts either.

I am with you. Your tractors are what I like to call "parade ready." They look good at 50' when they are always moving, but when the parade is over and you walk up to it and really look they aren't perfect. I have found any CL (or other sales place) ad that says parade ready is not up to my stadards. Most are just pressure wash and paint jobs. I REALLY hate when people just paint over bad wiring and leaky seals/gaskets.
 
I wouldn't use clear over impliment paint. If you put it on while the paint is too wet it will wrinkle if you put it on when it's too dry it won't stick and/or gives you a sandpaper like finish. If you get it just right it won't be by time you put clear on the entire tractor.
 
exactly.

Even an average paint job on a perfectly prepped surface will look better than a perfect paint job on an average surface.

Surface prep is EVERYTHING in painting. Unfortunatetly, it's an art form that has to be learned over many years.

Couldn't agree more with the advice to never think paint is going to be thick enough to hide something. In fact, quite the opposite is true, it's just going to make the flaw shiny!

Of course, spraying is also everything in painting too - and that takes many years to learn as well.

Your work looks great in the pictures. But, we can all understand wanting to be better at it.

The problem is, you can't buy the solution. Or even learn the answers from others. A better paint, or a better spray gun might make slight differences, but you'll never by fully happy with the results.

The answer is, if you want to be better at body work, you've got to do it constantly. Over and over again.

Any "show quality" tractor you see has either been painted by a professional, or by one REAL lucky hack that had great metal to start with, and got lucky with the sprayer.

So, I'm not saying to give up - but just keep things in persepective. The pro's are expensive, and you'll appreciate why the more you try to improve yourself.

Meanwhile, check out the paint/bodywork forum on this site. There are a ton of real knowledgeable guys over there.
 
OK. One step at a time. You don't know how to do bondo.
After sandblasting make a deal with the guy you know who has a body shop. You want to bring the fenders in for bondo AND you want to watch (lesson) how to do it. State categorically you will pay for the drill. Any good honest shop should do that for you. I'd suggest you start with the new small shop in town. Not the biggest most successful shop. This is a procedure the big shops give to the new hires. It ain't rocket science. Maybe someone on this site close to you can help. Stop in here and I can have you filling in an hour.
 
DO NOT have your sheet metal SAND blasted.Have them MEDIA blasted.It will GREATLY help cut down on metal prep time.Sand really gouges sheet metal more than people care to admit.You should have seen my cowl off of my Super M AFTER media blasting.Other than the "dings" I have to work out.It ALMOST looks ready for paint WITHOUT any primer !
 
I think you have REALLY nice "working" paint jobs on these! But,If you are looking for a "show pony only" paint job,It would probably be worth your time to bite the bullet and Hire out the sheet metal part.(Unless you are REALLY just wanting to learn the buisness of professional bodywork?)Getting better at the chassis "cast iron" parts would be my first goal.There again,you can practice with body fillers,grinding sanding process.On my own stuff,I WOULD NOT even cosider doing my own sheet metal(IF I was looking for a "concourse" restoration???)And BTW,all of those show tractors Are,for the most part,are WAY over restored !!!!! Talk to any "old timer" who bought them new !!!!They will tell you they looked nice,but NOT "Ferrari" nice!

BTW,you have some nice Farmalls there !
 
I use about the same process as yours only, I use Zchrome which is a high build primer to fill in any pits or flaws in the sheet metal. This stuff is almost like sprayable bondo and works real well on pitted metal. I block sand when dry and wet sand before painting. Sometimes when I want the castings to be extra slick,I'll give them alittle shot of the Zchrome for effect. Your tractors look really good to me.
 
I have painted many tractors over the years, ones of my own and i also do custom painting in the winter. I take as many parts off the tractor as possible. I use an air sander with stick on pads for the sheetmetal.. i use the DA sander to sand any filler or old paint off then prime it,then hand sand it with a real fine grit. I like to paint all the sheet metal in one session,then do the chassis the next weekend.. I can concentrate more and do a better job on the sheet metal...then i'm not rushing to get the whole tractor done at one time...just my 2 cents
 
Apparantly all you are doing is scraping a little, sanding a little and washing the tractor. That is not nearly enough. You don't mention primers or surfacers. Clean EVERYTHING and then prime. It takes me hours or days to get a tractor clean. Wash the cast, wire brush it to bare metal, then clean it with soap and water, then wax and grease remover until the rags come away clean. Prime with epoxy primer, nothing else. Then topcoat. Don't be concerned with the flaws in the cast, they are supposed to be there. If it is really rotten, use a little body filler, but don't try to make cast perfect. On the sheet metal sand to bare metal -- ALL bare metal. Use body filler for any imperfections. Trade name BONDO is the poorest body filler made. Get some body filler from your paint supplier. Mix a little at a time, it is very sensitive to the amount of hardener. Use it until it becomes hard to spread, then make another small batch. The thinner it is the easier it is to sand, you may need multiple coats of it. Do as Gordo says regarding the sanding. When it is as smooth as you can get it, use epoxy primer (2 coats) followed by a Urethane (uses hardener) surfacer. Put on three coats about 10 minutes apart, let dry and wet sand with a block or a board if you want to do it as Gordo does. You may need to repeat the surfacer 3 or so times. You can add a small amount of whatever you are using for the topcoat (follow the instructions) to get a different color, that way you can see when you have sanded to the previous coat. Be prepared to take a lot of time. After that you can topcoat. If you did not do a good job it will show in the topcoat. Sand the bad areas, apply more bondo and surfacer, and remove as much of the previous topcoat as feasible and do the topcoat again. As to your pictures, if you can see imperfections in the photo, as Gordo mentioned about the fender, it is a lousy paint job. Regardless of the favorable comments, pictures are worthless, they simply do not show detail -- that has to be seen in person and is the reason some do not like your tractors. You need to take more time. There is a TON of info on the paint and body work forum on this site. Spend a day reading it. I apologize for the harsh answer, but you admitted your problems and need help.
 
Actually using sand on sheet metal is a bad idea because it can warp the metal. It's not the heat as a lot of people think, but more from the impact of the sand particles - like little hammers - on the metal.

That's why you want to go with something softer/lighter.
 
(quoted from post at 05:31:43 08/16/11) Actually using sand on sheet metal is a bad idea because it can warp the metal. It's not the heat as a lot of people think, but more from the impact of the sand particles - like little hammers - on the metal.

That's why you want to go with something softer/lighter.

It isn't as bad on a tractor as a car because the sheet metal is twice as thick but it still can be a problem if you don't know what you are doing.
 
Thank you all SOO much for the helpful comments and suggestions!! This turnout of help is what I was hoping for, and why I love this forum so much. In the meantime I will check out the Paint/Body Section, and I think I've figured out what I'm gonna try now.

After reading and putting my thoughts in, I've decided to clean the tractor (cast) a little better, and after I get the sheetmetal blasted, I'm gonna try the zChrome primer OR the Epoxy Primer. Probably the Epoxy Primer. Then I feel like I should wet sand that down really good after the 2 coats of primer dries the next weekend, then apply the IH Red Acrylic Enamel after wet sanding. I'm gonna apply 3 coats of the red to see how that works.

* Should I block it? (what does that exactly mean?, and what should I use if I should do that.)
* What sand paper should I use for wet sanding, and how do you do that process?
* I will use body filler as necessary, but the sheetmetal on both tractors is pretty dent and pit free.
* Is my process that I want to try out acceptable to where you think I will get better results? I want to at least try to add the sandblasting, priming with epoxy primer, and wet sanding to the process to see the differences before doing all of the other work mentioned. I might be surprised how much a difference that will make, and it might just be what I'm looking for. What do you guys think?? I'm not wanting them show perfect, but I'm wanting a pretty slick paintjob to the eyes and touch.
 
MY experience with sandblasting isn't all positive. One customer at the garage insisted we sandblast his sheet metal on his H, and since we didn't have the equipment, we sent it next door to the monument company. The formerly smooth sheet metal came back with dimples all over it from the sandblasting process.

So sandblasting didn't speed up the process, it actually slowed it down, as we then had to coat the entire hood in spot putty to get the surface smooth again...and then hope that the inherent flexing of the hood in removing and installing it over the next several years didn't cause adhesion problems with the spot putty over time.

Maybe a walnut-shell medium might have been gentler on the metal, as I've since heard; but in the 1960's sand blasting actually meant using sand.
 

I would get it media blasted (walnut, etc.), but I really don't know where I could take all the peices to get it done. I am taking them to company down the street from us that does industrial coatings. It is a plant that puts coatings on pipes and such. Basically they are in the sandblasting business because thats all they do. A guy that does it there has agreed to do this for me for a small amount of money. I had him do a Cub Hood/Gas Tank and 4 front wheel rims once before. I had good results with that with no pitting, but it actually put 2 pin holes in the side of the gas tank mainly because this hood was really rusty. I got the tank lined, and the holes all fixed up and primered and you'd never know. He did the hood and 4 front rims for $25
 
The steel on the hood of an H is about .075 thick. A fender is .125 thick. Trust me, there is no way you are going to warp them. You might damage a hood or grill if it was rusted almost through in some spot. That would be the only way.
 
You DON'T sand the epoxy primer. It is very tough stuff, and you don't want to expose any bare metal.
Feel all the sheet metal with your bare hand looking for dents or bumps. If you can feel them with your fingers they need the "bondo" filler.
If not then shoot the pieces with the heavy primer surfacer. Then you block sand the first time with 220 dry paper, the second time with 320 or 360 wet paper with the rubber sanding block. You have a big sponge in your left hand and the block in your right. You keep squeezing clean water onto the area you are sanding.Also have a bucket to douse the block into to clean the gook out of the paper.
It will leave a big mess on the floor where you work, so pick a spot you don't care about or work out over the gravel or grass. Not on the driveway!
 
OK Gordo! Thanks so much for clearing that up! I had the idea that's how you did it, but really needed to make sure. I recently bought a rubber sanding block for a buck at a local flea market, so I guess I will be putting that to use.

It sounds like I will be going to the automotive paint store and getting me some heavy primer surfacer to spray on once the sheetmetal is blasted and ready. I'll also pick up some 220 Dry Sand Paper, and 320 Wet Sand Paper. OR should I use the 360? What's the difference? After that's all done, I'll clean with soap and water and start spraying the IH Red (for the 140).

How long should I wait until I start sanding?
 
It really all depends on who is doing it,but believe me,you CAN tear the crap out of the sheet metal with sand(as well as other media.)It is not just the abrasion of the sand,it has alot to do with the heat generated on the steel.ALSO,alot to do with the CFM of the air supply of the compressor and size of the equipment.My family did it for several years.You ought to see the king of damage you can do with a 675 CFM compressor and a 2" feedline with a 5/8"or a 3/4" nozzle !!!!
I have sent out sheet metal that looks in good condition when it comes back,but after you start body working the metal,you can REALLY see and feel the "wave" in the surface that was left behind by a "harsh" sandblast job.I am not saying sand cannot be used,but the safer medias made for body panel cleaning are MORE fool proof.LESS likely to tear up anything under all kinds of different air pressures,CFM,distance from panels.It really is mostly to do with the person doing it,and on RARE parts being blasted,it AINT worth taking a chance on !!!!
 
Not a lot of difference, use the 320 it;s a little faster You can sand it about 45 minutes after spraying.

Don't know what you have for a gun but you should have a 1.5 or larger tip for the primer, and a 1.3 or smaller for your paint.Look for an older Binks or Devilbiss at the swap meets. That's the gun the pros used for primer back in the day.
 

If I sand 45 minutes after spraying the primer, won't it still be wet?? I know the paint isn't dry to the touch until about the next day.
 
(reply to post at 19:38:44 08/17/11)

Hey Guys....I am about to order the "Heavy Primer Surfacer" and some 220 dry paper, some 320 wet paper, and a big sponge. I've got a siphon type paint spray gun (similar to Binks if it isn't one). I will use it for the primer, and my top load gun for the paint. Gettin the stuff blasted tomorrow after I return from picking up a Cub tractor and some implements I bought today. Probably gonna shoot the primer Saturday morning depending on when I get home. THANKS FOR ALL OF THE HELP!!!

One last question though......If I sand 45 minutes after spraying the primer, won't it still be wet?? I know the paint isn't dry to the touch until about the next day.
 
(reply to post at 02:27:12 08/19/11)

Well, I just got off the phone with the Automotive Paint Supply Store. They will not sell me the Heavy Primer Surfacer because they said it has to have something to stick to. They said they have a product just for the sheetmetal after its been sandblasted. Its called "ALL YOU NEED", and its $130 a gallon. I THINK (not sure) it is an etching primer. The guy said once the materials have been sandblasted, wash them off with soap and water and start spraying. They said to then sand it dry, and it should be good to go to paint after that.

What do you all think?? Sounds like I don't have a choice. haha.
 
We said that. You use epoxy primer and then the filling primer over that. (the filling primer will use the epoxy primer to stick to) With all that, they are in the business so they know what they are talking about. Let them know they you are painting a heavily pitted surface and ask them what they recommend.

No, the primer will not be wet if you wait 45 min. (Not if you spray it right) Paint will take a little longer (read the label)
 
RTR - Thanks for asking those obvious questions and sticking with it. I have learned a lot from reading this post and it will help me in my projects.

Thanks to all the contributors, some of us know a lot less than we need, and appreciate your step by step explanations and patience
:)
 
(quoted from post at 05:07:36 08/20/11) RTR - Thanks for asking those obvious questions and sticking with it. I have learned a lot from reading this post and it will help me in my projects.

Thanks to all the contributors, some of us know a lot less than we need, and appreciate your step by step explanations and patience
:)

Well put!! I really appreciate everything, and to me, you can never put something too simple. The more in depth explained, the better off we are. I actually didn't get the.parts blasted today because we got home from the auction too late. It took 3 truckloads to get everyrhing home, so I didn't make it. I might have to ask some more questions so I can make surr what I'm doing is ok, and how to do it. The way I see it, the more questions I ask, the better off I am.

Thanks again guys!!!!
 
**UPDATE**

After spending 2 weeks prepping the tractor for paint, I am heading to the paint supply store in the morning to get a gallon of the self etching primer "All you Need" they recommended. To help get the tractor clean of the flaky old paint, I used a product called "Jasco Paint Remover" in the spray can bought at Lowe's. It worked pretty well, however it seemed to make the paint more flaky in other places. I used 5 cans so far with 3 washes with the hot water pressure washer.

[b:158af94307]Should I keep doing this process before I prime (will it eventually all come off), or just get the wire brush on the drill out and get it all knocked off and sanded smooth??[/b:158af94307]
 
Here are some pictures after using the paint remover and the 3 washes. After I sprayed it with the remover, and washed it...the remainder flaky paint on the tractor was soft and "rubbery".

3272.jpg
3273.jpg
3274.jpg
3275.jpg
 
Looks like Your gonna have to get the wire brush out. Have fun my time is soon lol
DO NOT PRIME THAT
Larry O
 
You MUST do more prep work. I prefer the wire brush on the angle grinder. WEAR SAFTEY GLASSES 8) because wires go everywhere.
 

We sell tractor parts! We have the parts you need to repair your tractor - the right parts. Our low prices and years of research make us your best choice when you need parts. Shop Online Today.

Back
Top