Cub Fires on Exhaust Stroke

equeen

Member
Okay, men, I'm stuck again. Please help.

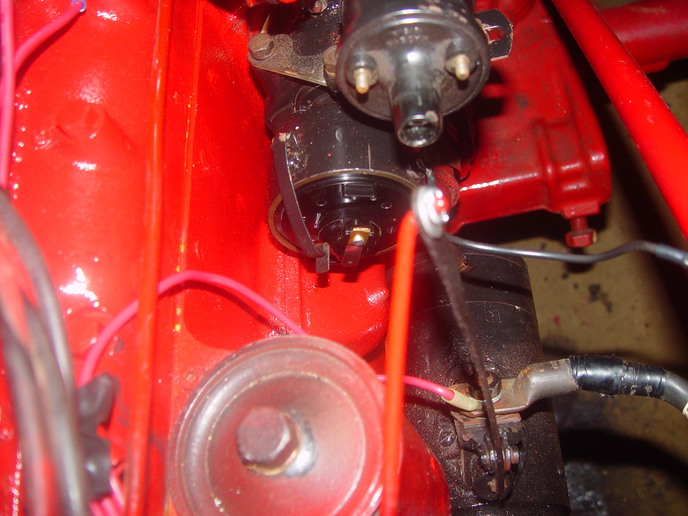
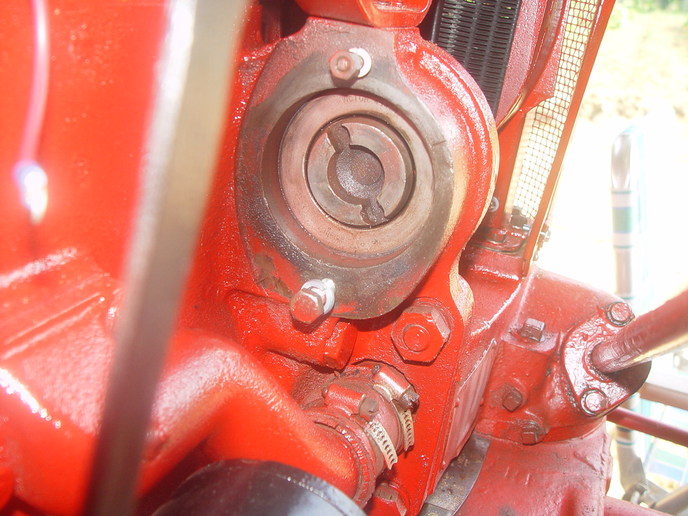
'50 Cub engine has been rebuilt; new points, fire to plugs in order: 1-3-4-2.

Fire seems to be on exhaust stroke as fire is seen in manifold after I put fuel into any cylinder, install plug, then attempt to start.

Hopefully a couple of photos are attached to help you set me straight. Thanks.
a41413.jpg
 
Photo of lug on distributor.
No further disassembly of distributor unit was done except for the replacement of points and condenser.
a41415.jpg
 
It is easy to get the distributor (or mag) in 180 degrees out of time.
To assess the situation, move all the wires two positions ahead. this will fire the plugs on compression.
If it works, I would retime it to have the wires in the correct location for future owners or to match factory practice.
2-1
4-3
is the way they should look from the factory from the rear of the tractor.
3-4
1-2
Is the work around to see if it is that problem.
Jim
 
Nobody suggests that there's anything wrong with the mag/distributor. On a four-stroke engine, the engine rotates TWICE for every revolution the distributor/mag makes...intake + compression strokes = 1 crank revolution, power + exhaust strokes = 1 revolution.

What that means is, it's entirely possible--and likely--that while you timed the mag/distributor to #1 cylinder at TDC, you're 360 crankshaft degrees, or 180 distributor/camshaft degrees, out of time.

Get out your crank, turn the engine complete turn while the distributor/mag is still off, and then reinstall your distributor/mag...and you should be within a few small degrees of being perfectly in time.
 
Presumably, your engine was turned to TDC on some cylinder in the first picture. Otherwise it would be a pretty meaningless picture. If so, your governor gear was not timed when it was installed. That is probably the root of your trouble. At TDC, the slots for the distributor drive should be at about 2-8 o'clock, not 5-11 like yours. With a magneto, you would absolutely have to pull the governor and reset the timing. With battery ignition, you can get away with it.

Set your engine at cylinder 1 TDC (if it isn't already). Take your distributor and rotate slowly clockwise until the rotor is pointing near the cap position for cylinder 1 and feel for the increased resistance as the cam starts to open the points. Pull the input shaft far enough out of the distributor to disengage the drive, rotate to the orientation that will engage the drive slots of the governor and push back in place. Do the distributor thing again to verify the position. Install the distributor and static time by the book.

Of you can time the governor and probably won't need to mess with the distributor.
 
Yes, the picture is meaningless to everyone but me - as a reference.

I tried the "thumb" thing for pressure in setting cyl 1 at top. But, little pressure then increased pressure then no pressure. So I got "smart?" and shined a light into #1 cylinder to see when the piston was at top. (And, yes, the slots were at about 2-8.)

Then I rotated input shaft on distr go get rotor cap pointed in right direction. (However I did not "feel for the increased resistance" per pg 27 of the manual.) Then I pulled out the input shaft and turned it as needed to mate with the slots in the "governor gear?". Then I pushed the input shaft back into the distributor drive and mounted the distributor.

Sooooooo. I shall try again. Question:
1. Using my thumb to feel for pressure from cyl 1; do I stop as soon as I feel ANY pressure?
2. Feel for increased resistance on the distr shaft - stop when feel ANY resistance?

Thanks.
 
Check the rotation of the distributor and make sure that you have the spark plug wires installed in that same direction of rotation. Otherwise, 2 cyclinders will fire on the "Power" stroke and 2 will fire on the "Exhaust" stroke. The engine will "Run" like this but not very well.

Yes, I learned this from experience!!!
 
The pressure is an indication of the compression stroke. The pressure lasts only as long as the piston is moving up. It should fire the plug at the very top of that stroke. Thus TDC.
Putting a new pencil in the spark plug hole just after you feel the pressure start, will allow you to be very accurate as to when the piston is at the very top.
(number 1 is the front cylinder to the radiator)
Best of luck. Jim
 
If you had gotten real smart, you could have shined the light on the front pulley and watched for the TDC notch to line up with the pointer. If there are 2 notches, the first is advance, the second TDC.

The increased resistance turning the distributor is slight and also depends on have the points somewhere close to properly gapped. If you can't feel it, take the rotor and dust cover off and look for the cam coming in contact with the point rub block.

(quoted from post at 12:24:08 06/01/11) I tried the "thumb" thing for pressure in setting cyl 1 at top. But, little pressure then increased pressure then no pressure. So I got "smart?" and shined a light into #1 cylinder to see when the piston was at top.

Sooooooo.
2. Feel for increased resistance on the distr shaft - stop when feel ANY resistance?

Thanks.
 
Smart and this Gene aren't often used in the same sentence when I'm tinkering with my tractors.

Okay, I aligned the notch on the front pulley with the pointer. (Then I removed #1 plug and peeked - yep, piston at top, both valves closed just as it was when I used my slow, trial-and-error method.)

So, my problem is with what I'm doing with the distributor. I'll work on doing it better per instructions. (I was thinking at the time that things happen in fractions of a second, but that it may take a longer fraction of a second for the spark to reach the cylinder, thus the spark should have occurrec by this moment; not later than this moment.) Is this why we "back up" the distributor just a tad?

Thanks.
 
Okay, Jim, you have aroused my curiosity. I know that the new pencil will not write me detailed instructions - because it has not been sharpened - sorta like me when it comes to engine internals.

And if I stick a pencil straight into the plug hole, the pencil will sit on the cylinder/engine wall. However, if the engine is left-handed, I could angle the pencil to have it on/near the exhaust valve. If the engine is right-handed I could angle the pencil to sit on/near the intake valve for the piston.

What's with the pencil - unless it's to see just how dull I am? Tehehe.

Thanks.

Gene
 

Just fer yer general knowledge electricty travels through wire at the speed of light. That's why when you flip a light switch you don't notice any delay in the light coming on.

1. Are you sure that the timing gears were all correvtly installed and timed?

2. Get it to TDC on #1 with both valves closed.

3. Take of the distrubuter cap.

4. install distrubuter with the rotor button pointing to the spot where it would be with the cap on pointing at the #1 terminal.

5. Make double sure the wires are correctly installed and try to start.

Rick
 
The timing gears were not tinkered with by the repair shop or by me. (Oops, maybe I need to check with the shop.)

Rick, what you are describing is just what I did originally.

My carb was out for rebuild, thus I poured a cap of gas into the cylinder. My new manifold had not arrived, thus I was able to see fire "belch" from the manifold w/no pipe. I did this three times, twice on cyl 4 and once on cyl 1. There was ignition and fire in the correct cylinders - just seemed to be at the wrong time - with exhaust valve open????


Hoping to have my carb back tomorrow. Will be better opportunity to really test it. Though I don't like fire in the manifold with gas "nearby".

Going back out to the shop and tinker some more now that the sun is down.

Thanks.
 
Attached should be a photo of the timing pointer and the engine pulley. Piston 1 is at top and both valves closed.

Next photo is of distributor.
a41471.jpg
 
Photo of distributor shows mark as to where center of #1 plug wire would be.

Seems to me that the rotor is not quite on the mark - at least not center of mark. As I recall, moving the lug to the next position put the rotor just past the mark.

Is there some "fine-tune" adjustment? I'm reading about adjustments to the distributor after removing the "distributor mounting" bolts.
Thus far, have not attempted any adjustment here. Only bolts removed were in mounting entire distributor unit to frame of tractor.
a41472.jpg
 
If the pencil is on the piston it will move up and down with the stroke. (I think you have the valves closed, and the mark on TDC now, so all is well.
If this continues to put fire out the exhaust, there may be a valve adjustment issue.
A compression check would confirm poor valve seating. If all else fails go there. Jim
 
I give up. After remaining parts arrive, I will install then load tractor onto trailer and take it to a repairman.

Compression readings: 1-50, 2-75, 3-75, 4-50.

This motor had new rings and inserts, valves ground and some replaced, etc. Valves were to have been properly adjusted.

This is out of my league now.

Thanks to everyone for their help.
 
My thought is that the service that built the engine should stand behind the adjustment. Those numbers are not good. My feeling is that leaving the other components off will assist in the repair of adjustment, if that is the only thing, and if more is wrong, it will need to be taken off any way. Sorry about the result of my suggestion, but you were trying valiantly to make it operate. Jim
 
Thanks, Jim.

Your suggestion was extremely helpful and appreciated. I should have checked compression early on.

As to leaving the other parts off for now, also makes sense.

This was/is my $400 "barnyard ornament" to allow me to get greasy hands and learn more about old tractors. However, I'm approaching my $$ limit on getting it to run as a small mower tractor. Patience ran out first.

My first love is my Fords: 8N, 650, 2000. But, I was developing an affection for this formerly ugly rusted little Cub. At least she "looks prettier" now in her new red "dress".
 

We sell tractor parts! We have the parts you need to repair your tractor - the right parts. Our low prices and years of research make us your best choice when you need parts. Shop Online Today.

Back
Top