need Pictures of Planter and Runner Setup on Super A - 140

Anonymous-0

Well-known Member
I am going to be installing a planter on my super A this weekend, and need some good pictures as to how to hook it up and attach it to the tractor. Looking at all those peices intimidates me. I'm not even sure if all the parts are there yet until I go to hook it up because I'm not similar with what should all be there. I would also like to see pictures of how the runner hooks up underneath to the front lift arms.


I greatly appreciate your time and help!!
 

Sounds like you mean a single row front mounted planter. There is a sort of U shaped mount that attaches to the front lift pads, hope you have it. It can be fabricated however, I did so.
If you post pictures of all the parts I can probably tell you what is missing or not.
 
I already have mine hooked up but I need some help on getting the proper gear selection to plant sweet corn. I don"t have any pics, but the runner bolts where your front cultivator bars bolt on. the planter drive bolts on with two bolts right around the starter and is driven from back wheel on opposite side, the fertilizer distributor bolts on with two bolts further toward the front of tractor and is driven off of the planter drive. That is the point I am at now, I don"t have a manual. so I need help with getting the right gears.
 
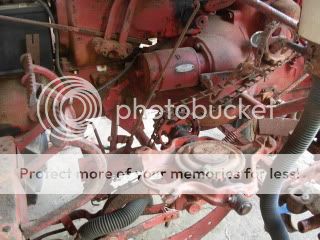
ep gave you some good info. Here are some pictures to show you how it's hooked up on my 140.
1st Photo is a side view. Following the drive chain from the 13 tooth gear on the left drive under the axle. they are; next one, 8 teeth then 7 teeth, then 12 then 8 and the last one drives the fert hopper drive with 13 teeth.
DSCN1351.jpg

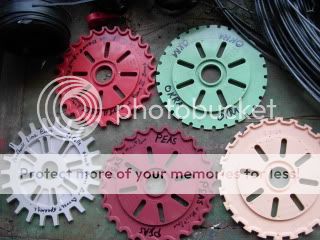
This picture shows the various seed hopper seed plates I have researched in depth and put together for my garden.
DSCN1352.jpg

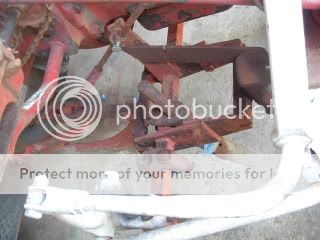
This picture is the downward, view towards the back and shows how this runner planter hooks up.
DSCN1353.jpg

Hope all this helps you. If you would like, I have an extra manual for an IH 184 planter. PM or email me with your address and I'll send it to you.
OB
 
Thank you all for the help!! I am pretty sure I can hook up the mechanical peices onto the tractor body (upper) becuase I have a 140 that already has that part installed.

My problem is the runner and the bar that goes in front of it. I am not quite sure how that all hooks up. I can tell a little bit from your last picture, but for the lift on the tractor, the square bar on the planter part doesn't look like it will be a match. The tractor's lift part has a diamond shape in the clamp, and the square bar on the planter part is oriented in a "square" shape instead of the diamond. I can get a few pictures in a little bit to help clear this up.

Also, the chain that is already on the planter drive that goes to the fertilizer hopper seems like it is way too long to work by looking at the one already on my 140. I wonder how the previous owner got it to work being soo long?? Am I missing something? If not, how can I shorten the chain without breaking it??

I will post pictures to help clarify some of this in a little bit. Also, I would love to see the manual if you don't mind sharing it with me! I will PM you so you can send it. Thanks!!!
 
Seed Hopper. What is the loop/eyelet for on the side about middleways down?
</br>
572.jpg

</br>
</br>
Runner Attachment
</br>
573.jpg

</br>
</br>
Layoff Bar Attachment. What are the extra clamps for??
</br>
574.jpg

</br>
</br>
Brackets/Clamps. What are these used for?? What goes into the round/rod clamp part??
</br>
575.jpg

</br>
</br>
Fertilizer Drive Attachment.
</br>
576.jpg

</br>
</br>
Seed Planter Drive Attachment (Photo 1 of 2).</br>
Notice the 2 long chains.
</br>
577.jpg

</br>
</br>
Seed Planter Drive Attachment (Photo 2 of 2)</br>
What size gears are these used to plant?
</br>
578.jpg

</br>
</br>
Fertilizer Galvanized Hopper Internal Parts & Seed Tube</br>
Is the galvanized tube used for fertilizer or seed? The other tube is
rubber.
</br>
579.jpg

</br>
</br>
Notice the size of these gears compared to the ones on my other planter that is mounted to the 140.
</br>
580.jpg

</br>
</br>
These are mounted on my 140, and are larger gears. What is the difference???
</br>
581.jpg
 

Also, just a heads up....the planter and fertilizer drive units are laying upside down from where I had painted them. Didn't want to confuse anyone. THANKS!!!
 
Here are some better pictures of the planter drives mounted on the tractor. I noticed the gearing is different than the one on my 140 and maybe that's why the chain is too long.

Is a gear missing, or should it be this way?
 
Very nice looking planter setup and tractor from what I can tell. Hope you get everything hooked up correctly, and I'm sure someone on here can help.

Post some final pics of the whole setup once finished for all of us to enjoy.
 
1. The two blue clamps in the 4th picture down, slide onto the square bar in your 3rd picture with the large nuts facing up. Those fit into and slide back into the keyhole holes on your cultivator lift bars. The blue assys lock into the diamond shaped part of the lift assy.

2. The extra clamps in the 3rd pix, are for attaching cultivating shanks with crows feet, hiller discs or fertilizer injectors on on them. The spade in the middle is for planting in a furrow or for potatoes. Take it off if your planting level or on a raised bed.

3. Notice the two red assys in your 7th pix. Those bolt together.

4. I would use the galvanized tube for the seeds and the rubber one for the fertilizer.

5. As to the size of the gears, Count the teeth and compare the sequence of teeth in my earlier post. It appears you have one gear on the wrong shaft. The shaft that runs under the tractor only has one gear on each end. The shaft on the seed drive unit has two gears side by side. Thats why you might have the longer chain. You can shorten the chain by holding one link in a vise and with a screwdriver and a hammer drive the other link out. Figure what length you need, take out another link then put it back together.
 
Does anyone know where to buy the drop tubes? I have a galvinized one, but I need another. Don"t care if it is gal or rubber.
 
(quoted from post at 14:41:07 04/10/11)
Don't know about the drop tubes. Maybe the Case dealer.

THANK YOU SO MUCH FOR YOUR HELP OB!!

We got everything installed on the tractor, and hooked up. As far as the gearing, I'm not sure if they are oriented correctly; but when I raise and lower the hydraulics it "puts it into gear" and seems to turn everything well. I have 2 other tractors with planter drives attached to them; and they both have the "tensioner gear" on the arm that goes to the rear of the tractor, just in the forward position instead of at the rear.

My only concern is that the 2 blue clamps that hold the toolbar on didn't tighten up very well onto the diamond cutout on the front lift. We made sure it was lined up and used an impact wrench to tighten it. Maybe it is supposed to sit like this....I'm not sure though. I've included pictures below to show you what I'm talking about.

Let me know what you think about the setup; and give me any suggestions you think I might need. THANKS AGAIN!!!


592.jpg

593.jpg

594.jpg
 

The blue clamps tightened snuggly in the front; but as you can see in the rear they didn't.

Also, what are the round holes in the blue clamps for?? What mounts in them?
 
Yes! you got right. I have had to lower mine, then tighten then raise it and shake it then tighten it a couple of times before it's really tight.

In your last series of pictures, the last one and the next to last, you show a blue planter driver with a red center. It's the one that bolts on to the geared shaft assy. I need one of those and a planter hopper. i could use either a single hopper and drive or an old duplex one. I have a second 140 I want to add a planter and fert dropper on it and sell it. I have everything else. You know where I can get one of those hoppers and drive plates?
Regards OB
 
OB,

We have about 5 complete planter & fertilizer set-ups for Super A-140, several miscellaneous drivers, about 8 fertilizer hoppers (both galvanized and fiberglass), and 5 or 6 Duplex Hoppers. Oh....and I've got several Cub Planter set-ups too. I really don't want to sell any of it though at this time. Maybe later on in the season, or next year I will. You'll just have to check back with me.

Thank you all for the help getting this thing together. It's the first time I've ever installed the Planter & Fertilizer Set-up on a Farmall Tractor; and it sure looks good!!! Completed pictures will soon follow in a couple hours.

Again....what are the round mounting holes for in the bracket/clamp that holds the layoff bar on?? The blue clamp is the one I'm talking about. Do row markers go in those holes; or something else????
 

If you are speaking of the plate that bolts to the gear drive ONLY, I could sell you one I have. It is the plate with teeth on the bottom that is fastened with 2 countersunk screws. On this particular one, it is supposed to have 2 "tabs" sticking up to turn the seed plate. This one only has 1 tab because the other one has broken off just short to catch the seed plate. If you are planning on selling the tractor and planter, I'm sure you could either repair it and build up the tab; OR use it as-is. I'm sure it will work fine with a properly oiled Planter Drive System with 1 tab.

Just let me know.
Email me at [email protected] if you are intrested.
 

Here are the completed pictures of the Super A with the Planter & Fertilizer Attachment. I have many more pictures of it from different angles; but here are a couple quick ones. I've also included a few of my other Farmall's sitting in the shed. Let me know what you all think! If it weren't for you guys, the planter wouldn't have went on the tractor in 2 days!! THANKS


600.jpg


601.jpg


602.jpg


604.jpg
 

We sell tractor parts! We have the parts you need to repair your tractor - the right parts. Our low prices and years of research make us your best choice when you need parts. Shop Online Today.

Back
Top