
Matt Weltz
Member
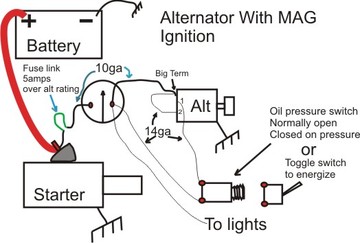
Ok so I am converting my 1951 Farmall MD to 12V with an internally regulated alternator. I bought a low-cut in 1-wire alternator and wiring harness from the Brillman Company. I was told it would be the correct wiring harness to allow me to delete my voltage regulator and switch from the generator. I am having problems getting everything hooked up. My old wiring is mostly gone so no help at all. According to the direction from the Brillman company here is what I have:
Negative ground off battery. Positive to starter button, starter button to starter. Starter button to - ammeter. + ammeter to BAT on alternator. + ammeter to fuse, fuse to #3 on light switch.
Now there is a wire that also goes to #3 on the light switch but not sure where the other end goes??? Also have a wire running from that same area to the front of the tractor but not sure what it is for. Tractor will start (magneto) and run but the ammeter gage never moves (it works - i previously tested it) and the alternator does not charge. What do I need to do differently??? Any help would be appreciated!!! I have looked at farmallbob wiring diagrams and cant seem to figure anything out...
") Maybe I just didnt not hit a high enough RPM the other day to excite the alternator? Oh well its all working now! Thanks for your help!
Maybe I just didnt not hit a high enough RPM the other day to excite the alternator? Oh well its all working now! Thanks for your help!