McCormick-Deering 10-20 trying to fire

ok guys, I started a new topic on this for the update. Thanks for all of the information. I fixed a stuck valve and now have compression in all 4 cylinders. I can see a fair amount of carbon on the pistons so that isn't helping either. I was just using a cheap compression tester that is very difficult to get air tight so my # are probably way off but at least confirm that I have some compression.

I was able to get the motor to almost fire. I get ignition in the cylinder and exhaust coming out but it seems to be firing or trying to fire when I am trying to move the crank to the bottom so I can get a proper upswing with the crank and not break my arm.

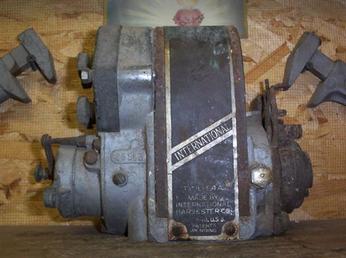
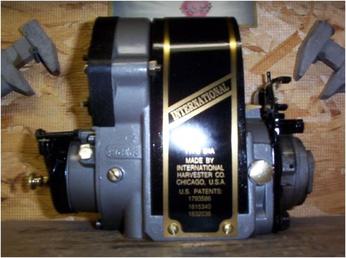
I am trying to confirm that the timing is right but do not understand the instructions for this procedure in the 10-20 owners manual. I have the mark on the bell housing lined up with the notch on the flywheel. I can take the front of the mag off but that is where I have stopped.

If anybody has a common sense explanation (and wouldn't mind sharing it) on how to set the magneto up or at least check the timing I would appreciate it if you took the time to explain it.

I would like to confirm that the timing is correct before I crank myself to death.

I will have some help next week at thanksgiving so we will try and pull start it then. The crank, rods, cam, lifters look brand new. Very clean, no rust, just perfect. the only issue I can see is that there is plenty of carbon on the pistons. Not bad for a blind Ebay purchase.

I would just like to get it running for fun. After thanksgiving it will go in to get new rings, valves checked and new gaskets. After that the motor will go into my other tractor that is getting sandblasted and painted.

Thanks for everyone's help on my other posts. I would love to report back that we get her going and put video of us driving around the yard.

Dave Koenigsfeld
Nixa, MO
 
I forgot to say that the pawl now engages on every turn now and clicks every revolution. I did not pay attention as to when it clicks but will tomorrow.
 
If anybody has a common sense explanation

(quoted from post at 19:34:38 11/19/08 ) I forgot to say that the pawl now engages on every turn now and clicks every revolution. I did not pay attention as to when it clicks but will tomorrow.

I think you answered your own question! 8)

For a simple check: just crank real slow until you hear the click. Now, look where the cylinder is (a feeler in the plug hole, or look in the hand hole, or the marks); since you're just playing with it, a little late won't hurt and less likely to hurt your cranking arm. Pull the cap off and the conductive area on it should match the cylinder at TDC and no valve activity (the other one should have had the exhaust open on the way up, and opening the intake soon) . After that double check, E4 I believe clockwise as you look at it, that the wires are right all the way around: 1front, 3, 4, 2 I believe.
 
Here's an easy way to check timing. Retard your mag all the way. In other words turn the points cover on the mag all the way up. Remove spark plug #1. Turn the crank until you can tell that that cylinder is on the compression stroke. It's easier if someone helps you but you can do it yourself. When the cylinder is all the way to the top, the mag should click. Remove the distributor cover and the contact block on the rotor should be very near the #1 spark plug connection. If it's not adjust accordingly. When you advance you spark timing lever, it will be at the right advance to properly run the engine. This is how I do it and it works every time.
 
Pull the cap off and the conductive area on it should match the cylinder at TDC and no valve activity (the other one should have had the exhaust open on the way up, and opening the intake soon) . After that double check, E4 I believe clockwise as you look at it, that the wires are right all the way around: 1front, 3, 4, 2 I believe.

I will check the TDC and the click of the mag. Your description of the wires does match the owners manual. Thanks, dave
 
Remove the distributor cover and the contact block on the rotor should be very near the #1 spark plug connection. If it's not adjust accordingly. When you advance you spark timing lever, it will be at the right advance to properly run the engine. This is how I do it and it works every time.

I get the first part. what is the contact block? is it the 'Distributor segment'? If I understand correctly, you are just adjusting the spark advance to get the motor 'timed' right. Makes life easier.

Thanks,
Dave
 
(quoted from post at 08:52:47 11/20/08) Remove the distributor cover and the contact block on the rotor should be very near the #1 spark plug connection. If it's not adjust accordingly. When you advance you spark timing lever, it will be at the right advance to properly run the engine. This is how I do it and it works every time.

I get the first part. what is the contact block? is it the 'Distributor segment'? If I understand correctly, you are just adjusting the spark advance to get the motor 'timed' right. Makes life easier.

Thanks,
Dave

Identical to the quote you just replied to from mine: you'll have a non-conductive gear [the rotor] right behind the cap [or distributer cover] with a condutive area [the contact block mentioned above] maybe 1/8 of the circumference wide at the diameter of the contactors.

The rest too, is exactly the same, except Mike is setting the engine position to #1 TDC first and checking the mag; I had you checking the mag then the engine position.

As far as the "advance lever" (this doesn't set the timing, just fine tunes it across the running speeds and conditions), by having it in 'Run' position when you check the timing this way, it may be just a bit late when you run the tractor, not enough to "run or not run" just not optized power; therefor by having it turned "Off" as Mike suggested it's at it's fully retarted [least advanced] position, it will be earlier when you bring it to run - just make sure you only have it at 1/3 postion, not all the way, when you start it!
 
The contact block is the part of the rotating circular plate inside the black mag cover that has the brass on it. It's shaped like a "T" with the tip of the "T" being along the outer edge of the circle. When I said adjust accordingly, I meant that you would need to decouple the mag drive and rotate the mag half to a different set of holes, continuing to do this until the mag at full retard snaps right at top dead center of the piston the mag distributor is pointing to.
 
Your description matched what I found in the 10-20 overhaul manual. It had a great picture, however, when I opened it the 'T' didn't match the firing order.

The T was in the upper left corner if looking at the mag. #1 was at TDC which I confirmed by the notch on the bell housing and the mark on the flywheel AND visually by watching the #1 piston.

I ran the spark plug wire from the top left position to the #1 piston and went clockwise from there in the firing order. I assumed that the rotor turned clockwise, I better check that.

An odd issue is that I see that the placement of the spark plug wires on the mag is different in the 10-20 overhaul manual vs the operators manual. I assume that this doesn't really matter as long as where ever #1 TDC is that the spark plug wire comes from there and the correct firing order.

I didn't get any fire tonight when I tried with the new plug wire order. I put the wire back in the first configuration and didn't get any fire that way either so I gave up for the night.
 
Don't forget that after timing it with the mag all the way retarded (all the way up with the arm on the points cover) that you advance the timing at least a little off of total retard. The mag will ground out in the total retard setting giving you no spark at all. Maybe this is what happened. The owners manual says to retard the spark about halfway which will tend to minimize any kickback when cranking. It think from your answers that you understand now what I am clumsily trying to describe.
 
I finally think I am understanding the process, thanks for your help. I think I will recheck everything early next week (I'm out of town until then). I will be ready for a pull start test on Thanksgiving day. I will have plenty of help to check for spark in all four cylinders and then give her a good drag. After about 10 hard upswing cranks, the joints start to hurt and I don't feel like I got much of a test.

Thanks for all of the help.
 
(reply to post at 22:06:30 11/20/08 )

Hey Mike, think I saw your W-14 in a book the other day; sweet! 8)

Sorry Dave, off topic.... back on...

[b:9e5ec562c4]Yep, sounds like you got it; no it doesn't matter where you start[/b:9e5ec562c4]- however different books might show different as many mags put a "1" mark on one of the terminals of the cap so you could remove wires later without checking the starting point. The 10-20 alone I'm guessing saw at least 3 different mags from the factory: Dixie, E4, F4 I think; the former two - again if I'm thinking right - turn the same way but have a different "1" marker - so the same drawing would work absolutely fine for either, [b:9e5ec562c4] it'd only make someone later do a small double take if #1 on the block didn't match #1 on the mag.[/b:9e5ec562c4]
 
Thanks for all of the great teaching, I am much more comfortable with the timing issues now.

Just got the photos today of my old mag that is being rebuilt. Here is the before and after shots.

I'm not sure if I can post a testimonial but I have to say from the pictures, this is amazing work. I would have to highly recommend them.

Mainely Magnetos
http://www.MainelyMagnetos.com

Dave
v6333.jpg

v6334.jpg
 
Thanks "spiffy" for your comments! When someone asks good questions about something I think I can help, I think it's all our jobs to help out if we can.
 

We sell tractor parts! We have the parts you need to repair your tractor - the right parts. Our low prices and years of research make us your best choice when you need parts. Shop Online Today.

Back
Top