|
Two-Brush Generators
If you are like me, you probably own dozens of electrical devices with the label:
"DO NOT OPEN. NO USER SERVICEABLE PARTS"
Whether for product liability or because the aftermarket parts and labor business is lucrative, this concept is disturbingly prevalent. Fortunately when you step into your shop and make that jump 50 years back in time to work with your old tractor, this concept goes out the window. Even so, when it comes to the charging system, people quickly revert to this idea and start replacing the major components one at a time until it works. The reason you don't find any decals in your replacement set with the above statement is that everything, including the components of the charging system, was designed with service-ability in mind. The key is understanding what the components do. The charging systems are actually more understandable than they seem but even knowledgable mechanics will let the electrics bluff them. I had my first experience with the mystique surrounding charging systems at sixteen. An admittedly good mechanic, whom I respected, helped me troubleshoot my two-brush generator system. We started with replacing the generator, then the regulator, then the battery, and finally the battery cables before the problem was fixed. Two years after this, I used his troubleshooting technique to help a different friend completely replace his charging system (and of course drain his wallet). We dutifully replaced components starting with the most costly and working down to the cheapest. In this case, after the entire system was replaced, we inadvertantly disconnected the ammeter which fixed the problem.
Over the last couple of years, we have had so much interest in producing a two-brush generator article that I knew it would have to be written sooner or later. The real difficulty was understanding these seemingly complex systems enough to provide some decent information and make them seem as simple as they, in reality, are. As I said in the three-brush article, electricity and the components that make it work are nothing short of miraculous to me, and on the antique tractor, the charging system must be the most complex part of the entire machine. Still, the system can be broken down to each component and function where, once you understand it, you can troubleshoot and repair it.
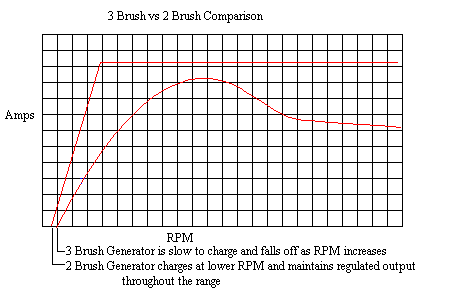
In the Three-brush Generators article, we discussed the three-brush charging systems, predominantly used on tractors in the 40s and early 50s. These produced fixed output based on the position of a third brush that limited how much output the generator could produce. This fixed output was turned on and off by connecting the field terminal directly to ground for full charge or through a resistor if a low-charge was warranted. This ground was indirectly controlled by the operator through a light switch. In short, if the generator field terminal was directly grounded, you would get full charge, if it was grounded through the resistor, you would get a partial charge. Since it didn't have any automatic control to allow for unusual conditions, inattention by the operator could easily let the battery get lower and lower over time or worse overcharge and damage the battery.
The third brush system had one other drawback. Since the fixed position of the third brush was the only limiting device provided to make sure the generator didn't run wild and burn itself out, it could not put out full current on high charge. It would not charge at all at low RPM and and at high RPM would dramatically drop in its charging output. The two-brush generator was applied to tractors in the late fifties to overcome these deficiencies. Unlike the three-brush system, the two-brush generator could achieve its true maximum output when the field was grounded. This meant that external controls would be required to keep it from burning itself out. This was accomplished by placing the current and voltage limiting controls into the regulator.
Simpler or more Complex?
The two-brush system was designed with a simpler generator by eliminating the third-brush, its spring, carrier and its wiring. As stated earlier, without that third brush, the generator (by itself) had nothing to stop it from producing full voltage at the current necessary to keep up with difficult demands like when you fire up a hard-starting tractor at night and immediately turn on the lights. This high output capability sounds too good to be true when coupled with the fact that it had less parts to wear out and was less complex. Unfortunately it is! This simplicity was more than offset by the complexity of the regulator. The third-brush system had merely a cutout relay to prevent battery discharge through the generator when it wasn't producing sufficient output. Beside that there was only the light switch resistor or a resistor in the regulator casing (you may have wondered why the regulator was so small on the old systems). The two-brush system needed more relays in the case and the wiring of the relays needed to interact. Lastly, the relay in the simple regulator on the third-brush system would occasionally kick in or out depending on the battery state or RPM while the voltage and current relays of the two-brush system would open and close up to 250 times a minute (later third-brush systems occasionally had this type of regulator also but on most tractors only a cutout relay was used). In general the two-brush system complexity boils down to the regulator being less user-friendly than those used on a three-brush system.
Generator
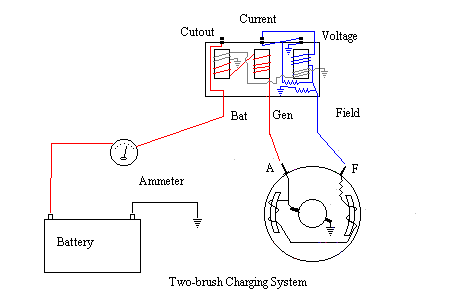
The two-brush generator was created by simply taking the wire coming from the field coils that would normally connect to the third-brush and connecting it directly to the wire coming from the brush on the output or A side brush (for this reason, it is called a shunt generator). By manipulating the ground on the field terminal side with relay-operated points, current would flow at full charge or not at all in rapid cycles. These cycles increased in frequency as current requirements dropped. From a visible wiring standpoint, nothing changed. It has a field (F) terminal and an output terminal (A). The field goes to the regulating device and the Battery terminal goes to the battery by way of the current relay, cutout relay and Ammeter. The main noticible difference is that the regulating device was now in the regulator and not in the light switch.
On occasion, some machines had three generator terminals. The third is a ground terminal that is provided to allow external grounding. Normally the ground for the second brush is internal through the generator casing. Due to the high resistance experienced from the generator mounting connection (rust, dirt and grime), using a seperate wire ensured a superior ground. This was used on high (24v) charging systems such as those used on large John Deere machines and many crawlers. Note that most references will refer to this type of generator as a two-wire even through there are three protruding from the case.
Regulator
The regulator on a two brush system has extensive interaction between the relays because they help trigger one another's opening and closing state. Now the complexity of the two-brush system becomes evident. It takes three seperate functions to make the system work to handle first the fully charged battery, second having a load such as lights turn on when the battery is up and last having a load and a discharged battery. To perform these functions there is a Cutout Relay, a Voltage Relay, and a Current Relay. These devices are all very similar in design being electromagnet relays. Depending on the direction of flow through their windings, they open or close. Though it is possible to combine the functions of the Current Relay and the Voltage Relay into one relay (called a two-unit regulator), it is best to see the functions discretely and so we well discuss the three-unit regulator.
Cutout Relay
The cutout relay is identical to that used in our old three-brush systems. It still opens when generator output drops below battery level to stop reverse discharge but in addition a shunt or wire to the voltage relay causes it to simultaneously close it's points and ground the field wire. This action causes the generator to increase its output which will theoretically will result in the cutout reaching its magnetic potential and closing its points again. It is important to realize that that shunt is not sufficient to cause the Voltage relay to kick in. It only helps. The primary thing that will make the voltage regulator kick in is discussed below.
Voltage Relay
The voltage relay, when open, allows the generator to have it's field grounded through a resistor. The charging rate of the generator is determined by "how much" the field is grounded. If through a resistor, a "low amount of ground" is provided to the generator and it charges less. When the field is connected directly to ground, the generator starts charging to its full rate. The voltage relay depends primarily on the voltage output of the generator to cause its points to open and reduce the ground by going to ground through a resistor. This happens because when the voltage passing through the electromagnet reaches the preset maximum for the windings, the opening of the points causes it to drop off in voltage until the cutout relay opens helping it to return to its closed state. This cycle is the normal one repeated during times when the battery is up or the load is light.Note: The voltage relay connects to the F terminal of the generator to apply voltage to its windings.
Current Relay
What happens when the load is high and the battery is low? Basically, when the current draw is very high (such as a low battery and high load), the voltage will never reach the level necessary to open the voltage relay points and relieve the poor generator. As with any "wide-open" running, the generator would meltdown. This is where the current relay comes in. It's points are wired in series with the Voltage Relay's points and will handle these unusual times by opening its points when the current reaches a certain level. During these load times, the current relay breaks the direct ground and runs to the resistor in the same way the Voltage relay would have under normal conditions. This allows the generator to rest which causes the generator voltage to fall below battery voltage and opens the cutout relay. The current relay then closes again (current has fallen) and the generator starts kicking itself up again. You can see the the current relay and voltage relay do exactly the same thing, but do it for different conditions and never do it at the same time. Either the voltage relay is working or the current relay and the points of the one not working are always closed. Note: The current relay measures its current by its windings being connected to the A or output terminal of the generator.
Wow.. you see what I mean by complex. In all honesty the complexity is justified. The tractor three brush generator system was used in a time when automobiles had already gone to the two brush system and tractors still were only equipped with lights by the most forward thinking farmers. If you combined a three-brush generator, nighttime field work, and a hard starting tractor, you were bound for trouble. In the days before alternators the two-brush system must have seemed like a God-send.
What about now. What about getting your machine to charge or keeping it from overcharging. Well... the key seems to be having your generator in good enough condition to produce its specified output and having each relay in the regulator set up to the specifications that the manufacturer intended. If...
- the generator windings are intact
- the commutator surface is smooth
- the insulators between the commutators are cutback to allow the brushes to ride correctly
- the brushes are in good condition and there is material left
- the wires to the brushes are intact and correctly insulated
...you have a charging generator and thus the cornerstone of a usable charging system. A quick test to see if the generator is at fault is to jumper the field terminal directly to ground. If your charging rate jumps, your generator is probably good (note, one minor complication to this simple test is if your cutout relay points don't close, the charge rate still won't jump even with a good generator, remove the cover of the regulator to make sure). It is amazing how many generators are replaced when they really are still viable. Many times the culprit in your problematic system is actually the regulator. Prior to the 1960s, regulators were built to allow you to rebuild them. Rebuilding basically consists of keeping the points in good shape, adjusting the air gap, and adjusting the voltage closure/opening position so that they could open and close at the correct times. If you have an old regulator and the wires that make up the electromagnets are still good plus there is material left on the points, there is no reason why you shouldn't be able to make it work like new. Remember that before you can do any meaningful work on a regulator, you will have to find the specific adjustment parameters for your regulator model and have a voltmeter and ammeter.
The cutout relay is adjusted as follows. The air gap is adjusted by a screw or set of screws that allow you to move the upper plate up or down. The points are adjusted by bending the upper armature stop and of course must be filed squarely with no nipple. These two adjustments require knowing and using the proper sized feeler gauge. The last adjustment is the closing voltage. This requires more specialize equipment. You will need an ammeter and voltmeter to determine if the points close at the manufacturer-specified voltage. The spring or more accurately, Armature Spring Post is bent to control what voltage triggers closure. The end result of setting the cutout relay is that it will open when the generator output is lower than the battery voltage and close when generator voltage exceeds battery voltage. The cutout voltage for closing will usually be slightly above battery voltage (e.g., one 6 volt generator/cutout combination I have calls for the points to open when generator output falls below 6.5 volts)
The voltage regulator has two adjustments plus making sure the points are filed squarely. The two adjustments are the air gap and voltage setting. The air gap is measured once again with screw adjustments and the feeler gage is inserted with the contact points closed. To adjust the voltage setting bend the spring away to increase voltage adjustment (the relay will take more voltage to close the points) or closer to decrease the required voltage. Remember that decreasing the voltage means it will kick in the ground thus raising the charging rate sooner.
Like the voltage regulator, the current regulator has two adjustments, the points and the current required to open the points. Make sure the points are filed squarely and adjust the air gap in the same manner as the voltage regulator (closed). The big difference is that the current adjustment must be made with a discharged battery and a load. This can be simulated by cranking the engine over without starting (such as with the coil wire removed... don't do this if you have installed an electronic ignition kit and never more than 30 seconds). By placing an ammeter in between your regulator's battery output, and the battery wire, you can determine at what current the current regulator is opening. Adjust to the manufacturer specification by bending the lower spring down to increase the point where it opens or up to decrease it. Increasing it means it will take more current to limit the charging.
With all these adjustments, be careful not to overdo the settings. The tendency can be to just get your machine charging but your battery and generator can easily be destroyed by too much of a good thing. Let me repeat this, get the manufacturers recommended settings prior to adjustment. It's impossible to shoot from the hip on this one. If your settings aren't correct, the generator will heat up excessively which in turn will melt and spin off the solder. This will probably mean replacement of the generator.
All that difficult stuff aside, the most needed information on setting up this type of system is usually the wiring. Most of us have functional generators and regulators but when we do our restorations and refurbishments we may have... well... er.. forgot to write down which wire went where when we pulled it all apart (Oh... I'll rewire the whole thing anyway). Hopefully the following will help in this case. If your generator has no markings as to which is the field and which is the A terminal, open it up and see which terminal goes to a brush, this one will be the A or the terminal that provides the output. The field will go directly and only to the field coils. That covered, the following diagram should help with the rest.
Good luck on working with your electrical system and remember that before you replace all the major components, troubleshoot and test first because remember... when you buy a vintage tractor's replacement decal set, no matter how much you rummage through the packet, none will say:
"DO NOT OPEN. NO USER SERVICEABLE PARTS"
Copyright © 1997-2024 Yesterday's Tractor Co.
All Rights Reserved. Reproduction of any part of this website, including design and content, without written permission is strictly prohibited. Trade Marks and Trade Names contained and used in this Website are those of others, and are used in this Website in a descriptive sense to refer to the products of others. Use of this Web site constitutes acceptance of our User Agreement and Privacy Policy
TRADEMARK DISCLAIMER: Tradenames and Trademarks referred to within Yesterday's Tractor Co. products and within the Yesterday's Tractor Co. websites are the property of their respective trademark holders. None of these trademark holders are affiliated with Yesterday's Tractor Co., our products, or our website nor are we sponsored by them. John Deere and its logos are the registered trademarks of the John Deere Corporation. Agco, Agco Allis, White, Massey Ferguson and their logos are the registered trademarks of AGCO Corporation. Case, Case-IH, Farmall, International Harvester, New Holland and their logos are registered trademarks of CNH Global N.V.
Yesterday's Tractors - Antique Tractor Headquarters
Website Accessibility Policy
-
This site uses cookies to help personalise content, tailor your experience and to keep you logged in if you register.
By continuing to use this site, you are consenting to our use of cookies.
|